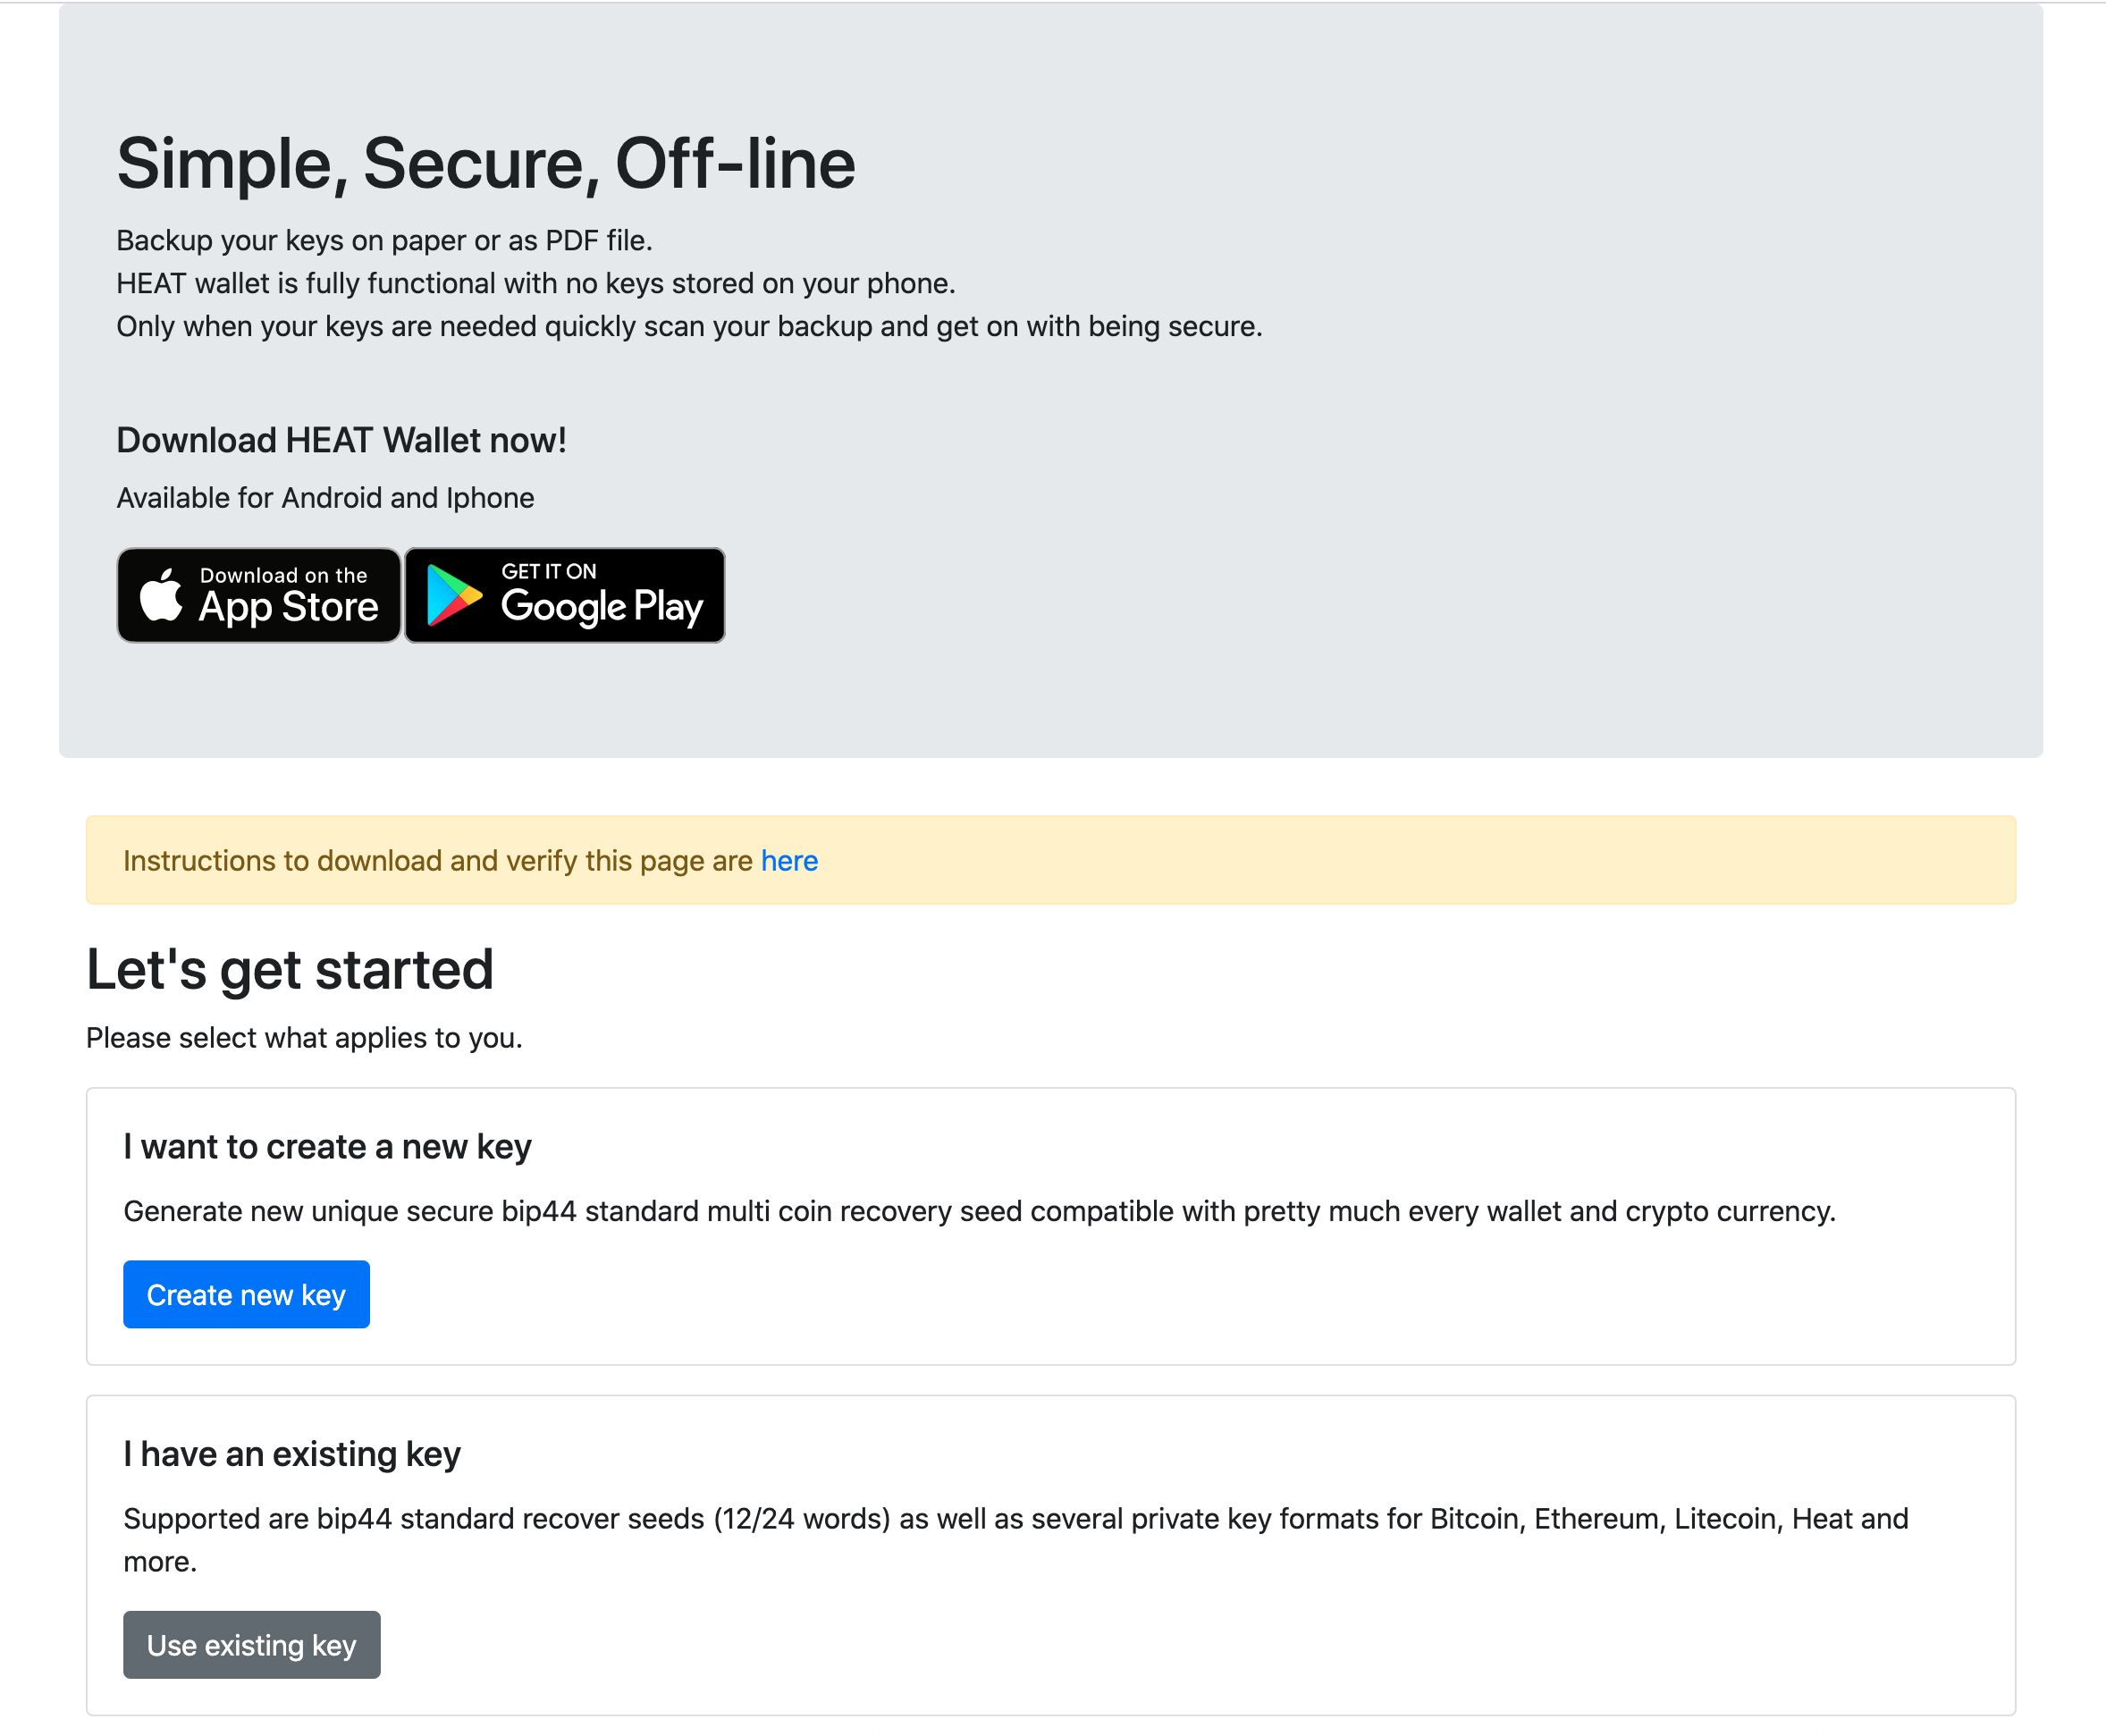
We have collected a series of helpfull instructions on how to use Heat Wallet
This the multi-page printable view of this section. Click here to print.
User Manual
- 1: Installation
- 2: First Use
- 3: All your crypto, one single key
- 4: Import Wallets, Keys and Addresses
- 4.1: Import Multi Currency Seed
- 4.2: Import Private Key
- 4.3: Import Heat Secretphrase
- 4.4: Import Paper/Digital Wallet
- 4.5: Import Any Address
- 5: Add new currency to existing wallet
- 6: How to start receiving crypto
- 7: How to start sending crypto
- 8: How to start staking
- 9: How to do an Airgapped Broadcast
1 - Installation
How to install Heat Wallet on your Apple or Android device?
Android
Android users with a Google or G Suite account can install Heat Wallet by following the link below. The app is available under the Google Play Tester program.

iPhone
iPhone users can install the wallet by following the link below. The app is available under Apple’s Testflight program. You will be instructed to install Apple Testflight which then installs the app for you.

2 - First Use
After first installation you have these options.
When first installed you are presented with a number of informative pages. There is a small close button at the top right to skip these. We however advise to swip left and read the few pages of information presented.
Info pages
First users are shown instructive screens, skip by clicking the small close button at top right.

Action Center
You are shown the action center from where you can select your next steps based on your needs.
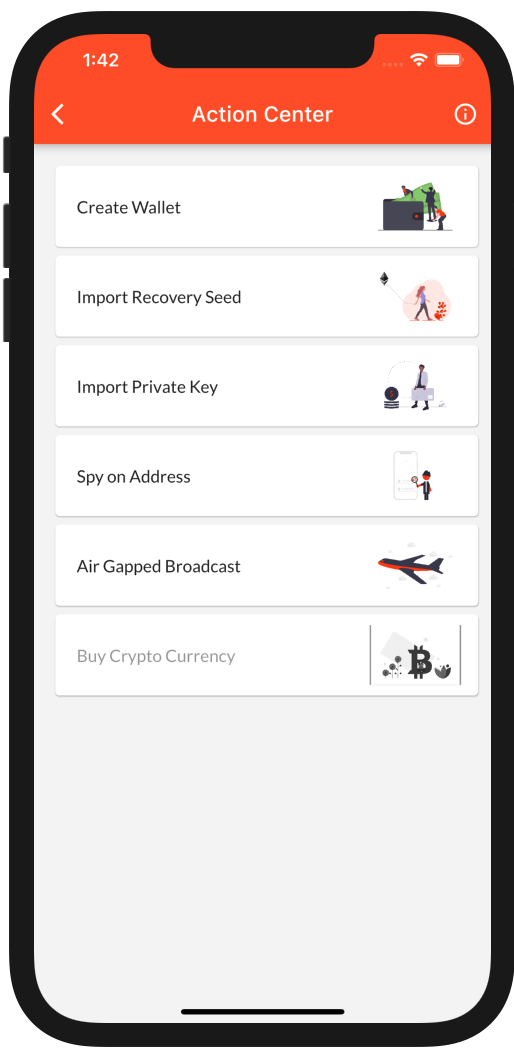
Create Wallet
Select Create Wallet to create your multi currency recovery seed. With this single backup key you can securely store every kind of crypto currency. If you are new to crypto and looking for a way to receive Bitcoin, Ethereum, Litecoin or any other coin (supported in Heat Wallet) this would be your choice.
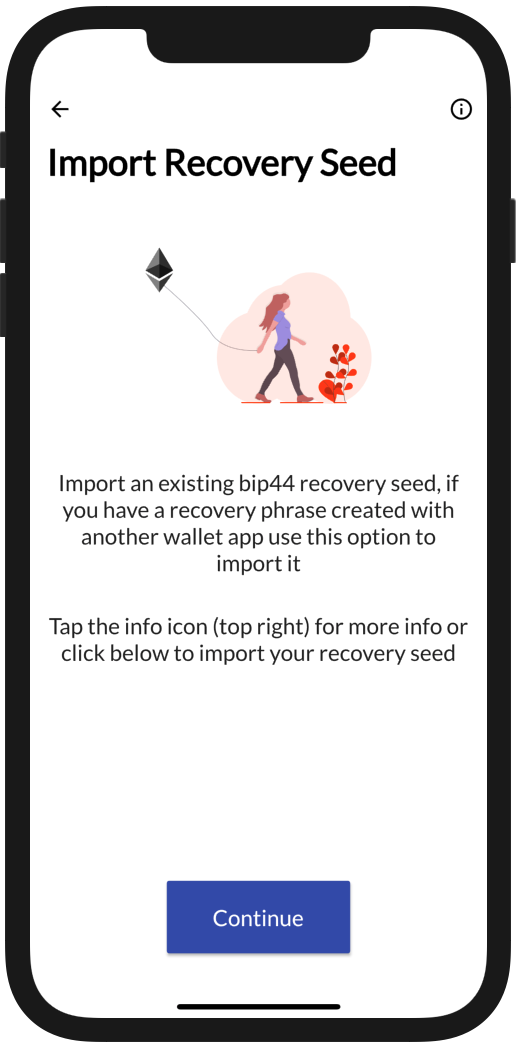
Import Recovery Seed
If you created a recovery seed before with either Heat Wallet or any other wallet app you can import that seed through this option. Either manually select which blockchains you want linked to this key or choose Automatic Discovery to have Heat Wallet search all (supported) blockchains for possible funds belonging to your seed.
Import Private Key
Heat Wallet supports importing native private keys for several blockchains. Supported formats
- Ethereum private keys
- Bitcoin, Litecoin, Bitcoin Cash private keys (hex) and wif (through provided conversion)
- Heat & Fimk
Import Address
Import any address on supported blockchains. Watch your own addresses in cold storage or any other address, no keys required.
Air Gapped Broadcast
Airgapped broadast allows you to keep your private keys secure and offline
3 - All your crypto, one single key
Create your unique secure multi-wallet, multi-currency standards compliant recovery seed.
Multiple names exist for what are technically bip44 seeds.
- recovery seed
- multi-currency wallet
- bip44 seed
Recovery seeds have become an industry standard and allow you to store many different cryptocurrency from many blockchains using just a single recovery seed.
Many other wallet apps support this same standard which means you are not stuck with a single app but can move freely between different wallet providers ensuring that as long as you properly back up your recovery-seed you can be sure to access your crypto funds with any other wallet app out there.
Recovery seeds take the form of 12 or more words from a standardized set of words.
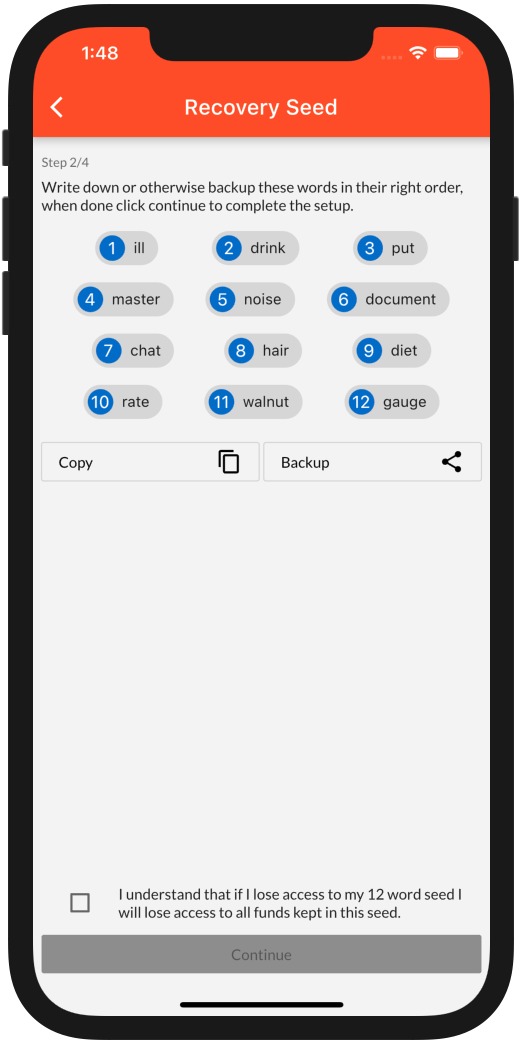
You have to back up these 12 words in their exact order to always be able to access your cryptocurrencies
Internally these words are used by wallet apps to construct a set of keys for each blockchain but in a standardized way so each app gives you access to your cryptocurrency.
Start at the Action Center
To import a recovery seed you have to navigate to the Action Center and select Create Wallet
To access the
Action Center: first time users automatically start with theAction Center. Users who created or imported a wallet will have to navigate to the Home screen where they see the menu button on top left. Open the menu and select the top entryWallets, in the next screen click the plus at the top right to access theAction Center
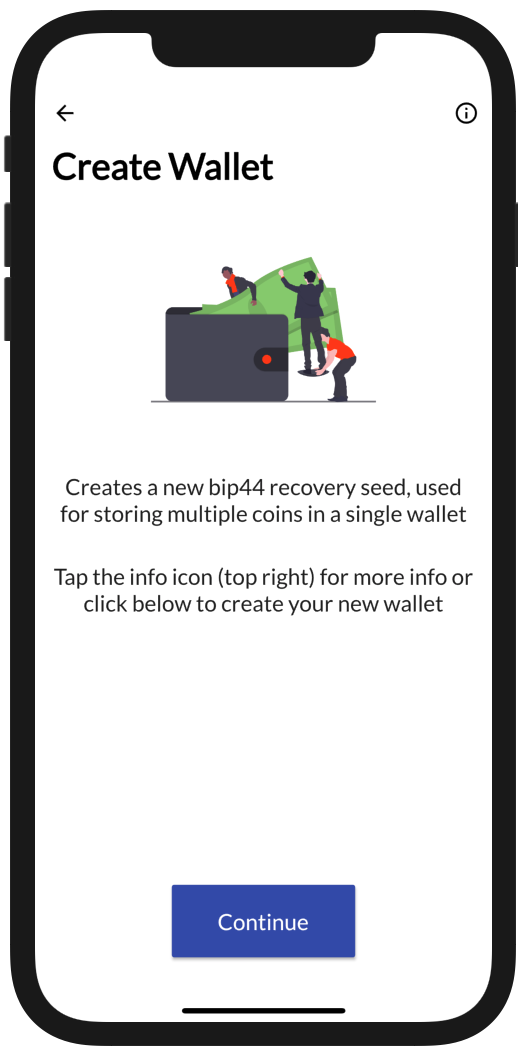
Create Wallet
You are greeted with information about wallet creation, swipe left to go through these instructions or close with the X at the top right.
Assign a name for your wallet (which can be changed later on).
Store as Hot or Cold wallet
Choose to either store your seed on your device or enter it every time it’s needed.
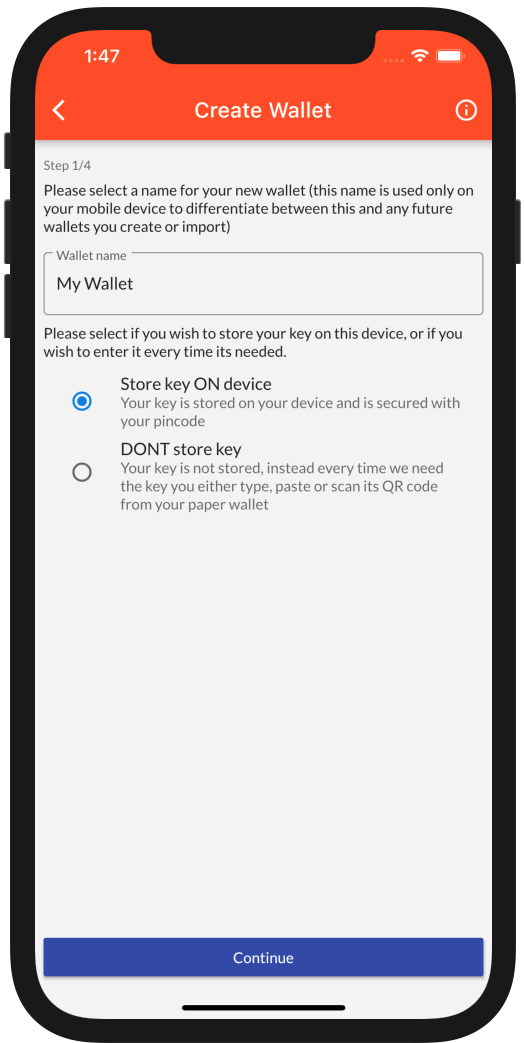
With Heat Wallet you can keep your keys offline yet still have a (almost) fully functional wallet on your device. You will see your balances and history but will not be able to spend your crypto until you provide your recovery seed again. One especially convenient and secure way to do this is if your recovery seed is in the form of a QR code which you can scan on demand whenever you make payment.
Back up Recovery Seed
You are shown your recovery seed, you have to back up these 12 words in their exact order to later access your cryptocurrencies
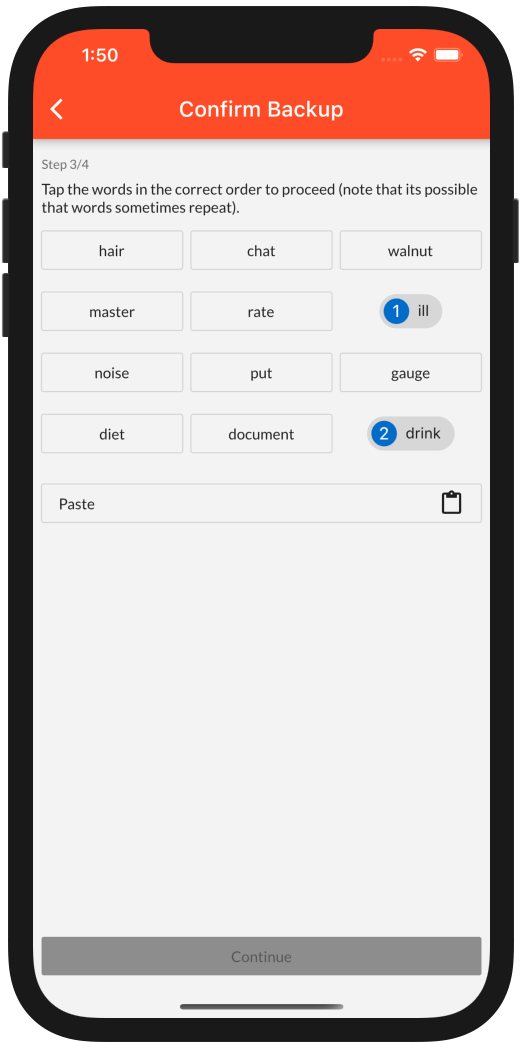
Confirm your Backup
Since your recovery seed is so important we require you to enter it again just to be sure you backed it up correctly.
Note that it can happen that a word appears twice in your recovery seed
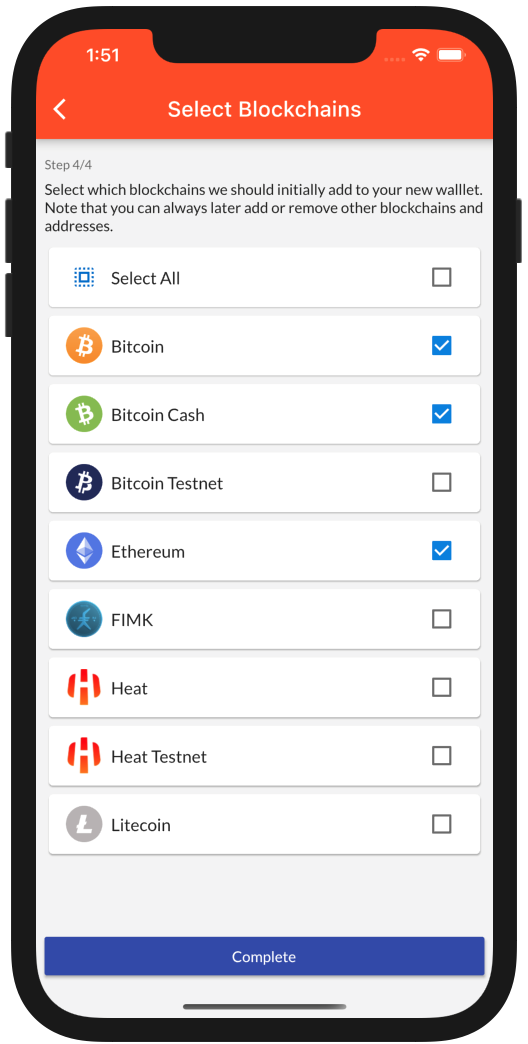
Select for which Blockchains
You are asked to select which blockchains to add initially add to your wallet, you can always add more later.
You are all set
You are ready to receive your first cryptocurrencies.
Please read on how to how to receive cryptocurrency
4 - Import Wallets, Keys and Addresses
Import multi currency seeds, private keys or any public blockchain address.
Hello
4.1 - Import Multi Currency Seed
Import existing multi currency recovery seeds you created with this app or other wallet apps.
Multiple names exist for what are technically bip44 seeds.
- recovery seed
- multi currency wallet
- bip44 seed
Recovery seeds have become an industry standard and allow you to store many different crypto currency from different blockchains using just a single recovery seed.
There are many other wallet apps that support this same standard which means you are not stuck with a single app but can move freely between different wallet providers ensuring that as long as you properly backup your recovery seed you can be sure to access your crypto funds with any other wallet app out there.
Recovery seeds take the form of 12 or more words from a standardized set of words.
You have to backup these 12 words in their exact order to always be able to access your crypto currencies
Internally these words are used by wallet apps to construct a set of keys for each blockchain but in a standardized way so each individual app gives you access to your crypto currency.
Start at the Action Center
To import a recovery seed you have to navigate to the Action Center and select Import Recovery Seed
To access the
Action Center: first time users automatically start with theAction Center. Users who created or imported a wallet will have to navigate to the Home screen where they see the menu button on top left. Open the menu and select the top entryWallets, in the next screen click the plus at the top right to access theAction Center
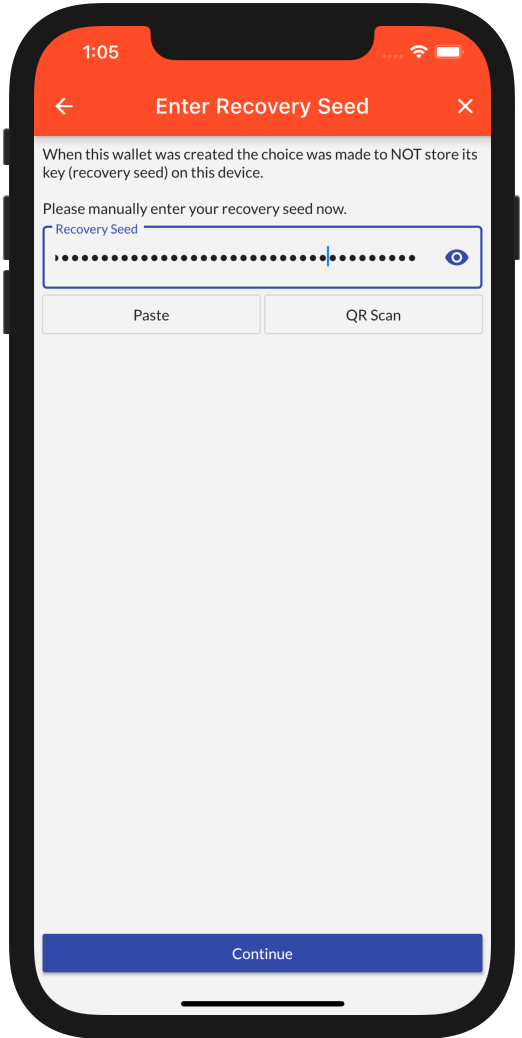
Import Recovery Seed
You are greeted with information about recovery seeds, swipe left to go through these instructions or close with the X at the top right.
Assign a name for your wallet (which can be changed later on) and enter the recovery seed either type, paste or scan a QR code.
Store as Hot or Cold wallet
Choose to either store your seed on your device or enter it every time its needed.
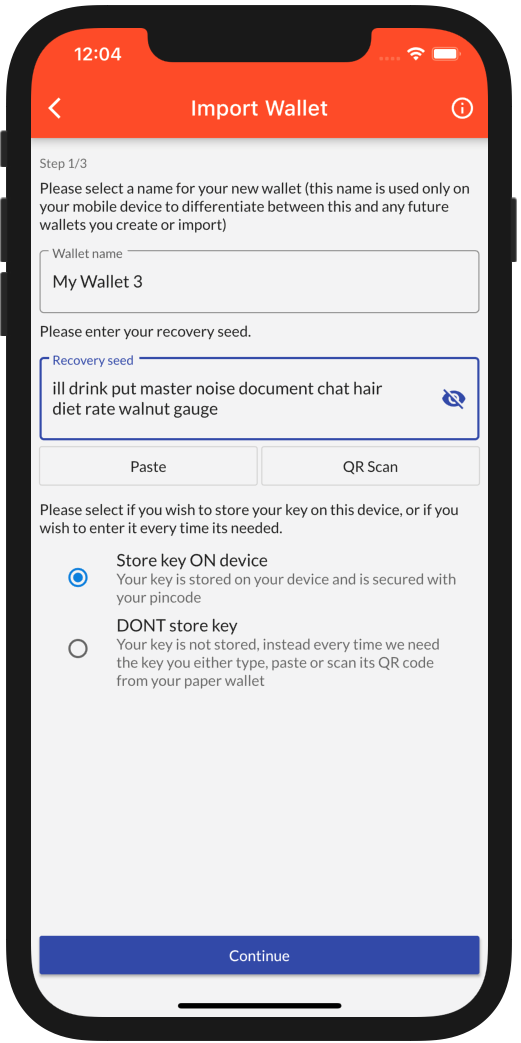
With Heat Wallet you can keep your keys offline yet still have a (almost) fully functional wallet on your device. You will see your balances and history but will not be able to spend your crypto until you provide your recovery seed again. One especially convenient and secure way to do this is if your recovery seed is in the form of a QR code which you can scan on demand whenever you make a payment.
Select for which Blockchains
Next you are asked to select which blockchains to add to your recovery seed. You have two options.
- Automatic funds discovery
- Manual selection
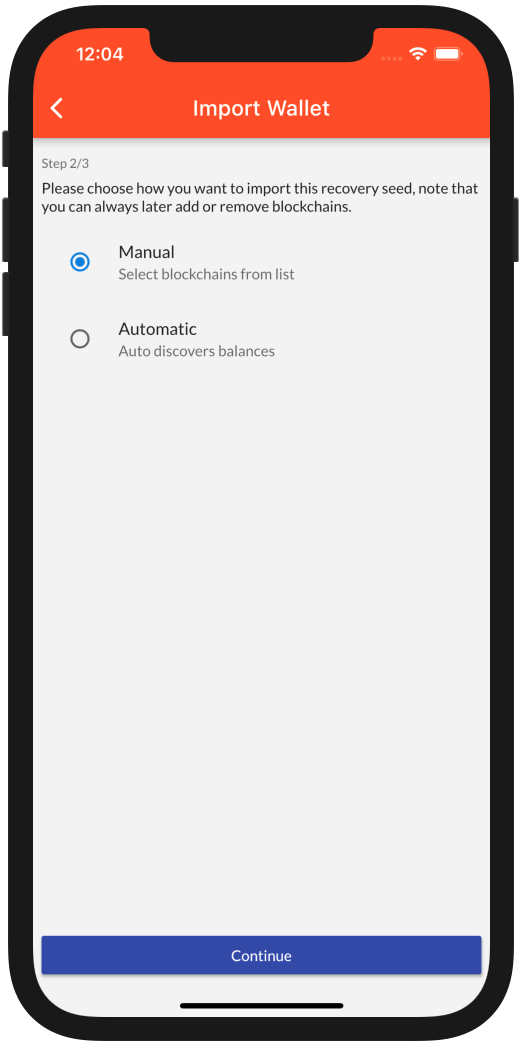
Automatic discovery will generate all addresses that could possibly belong to your recovery seed for all supported blockchains and Heat Wallet will go and search for any address you possibly have funds in.
Manual selection allows you to select which blockchains to add to your wallet (you can add others later on if so desired).
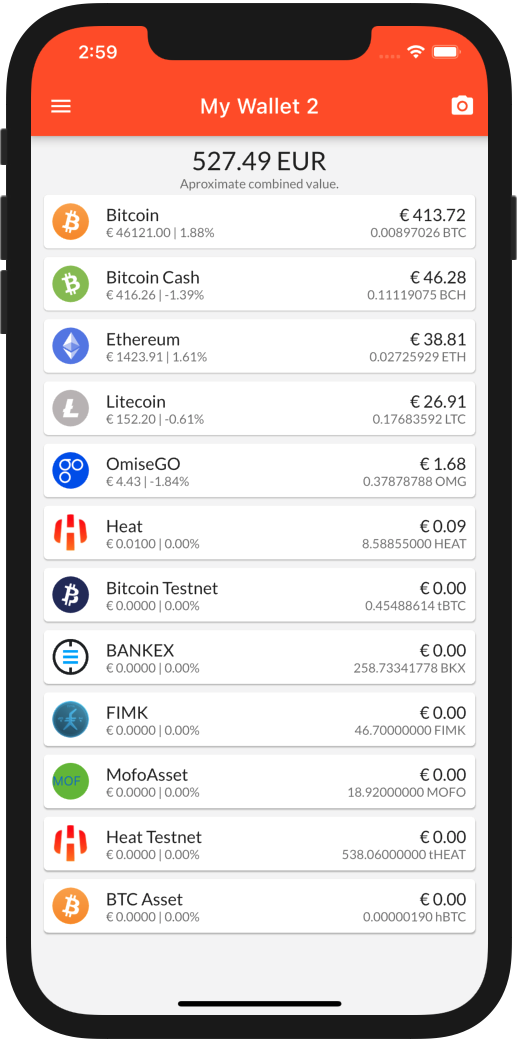
Access your funds
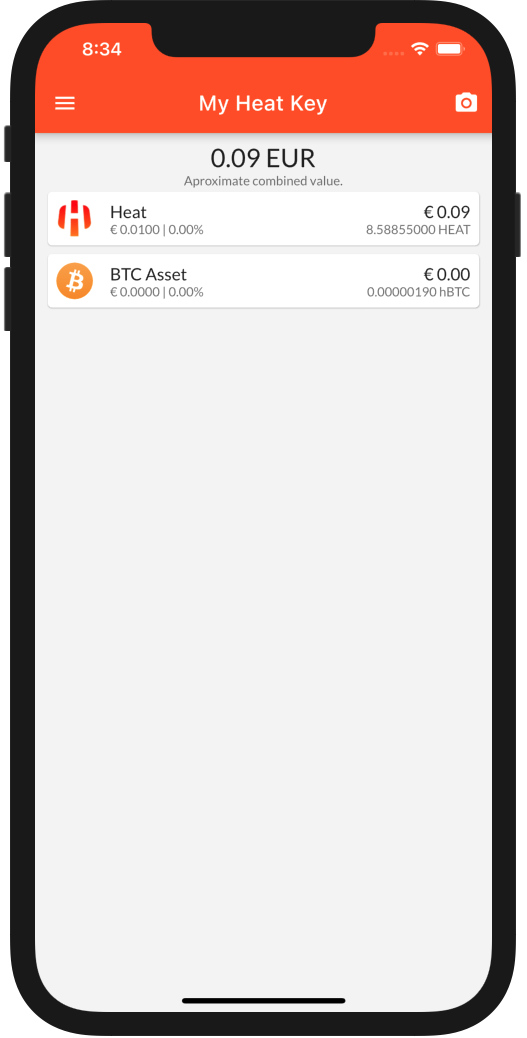
Your wallet is now setup and shows your balances for each token
4.2 - Import Private Key
Import existing blockchain-specific private keys.
Heat Wallet supports importing native private keys for several blockchains. Supported formats
- Ethereum private keys
- Bitcoin, Litecoin, Bitcoin Cash private keys (hex) and wif (through provided conversion)
- Heat
- Fimk
Start at the Action Center
To import a private key you have to navigate to the Action Center and select Import Private Key
To access the
Action Center: first-time users automatically start with theAction Center. Users who created or imported a wallet will have to navigate to the Home screen where they see the menu button on the top left. Open the menu and select the top entryWallets, in the next screen click the plus at the top right to access theAction Center
Import Private Key
You are greeted with information about private keys.
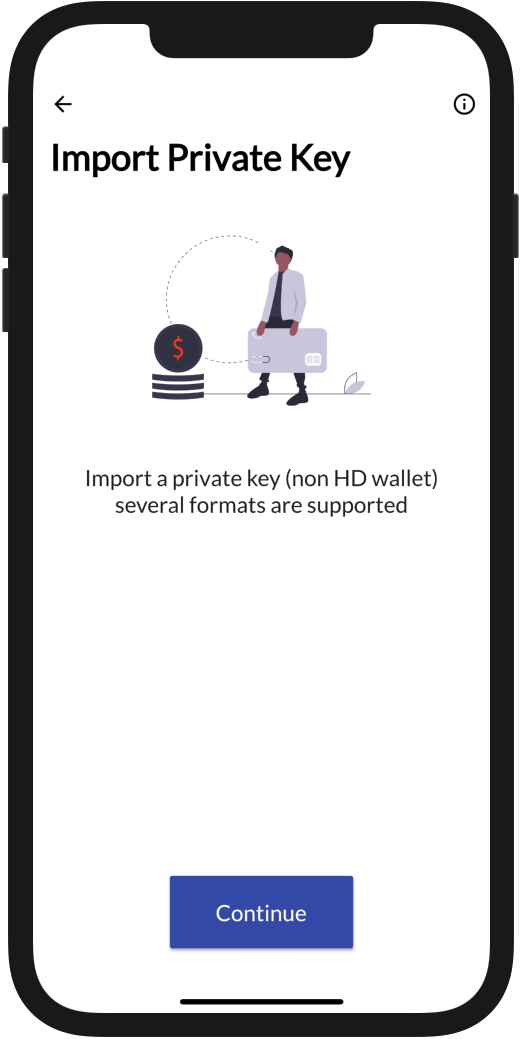
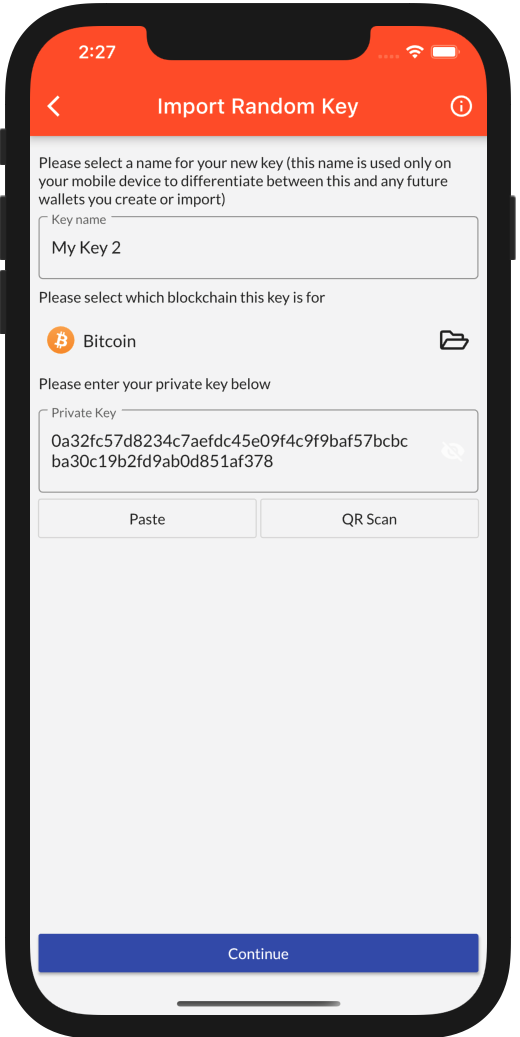
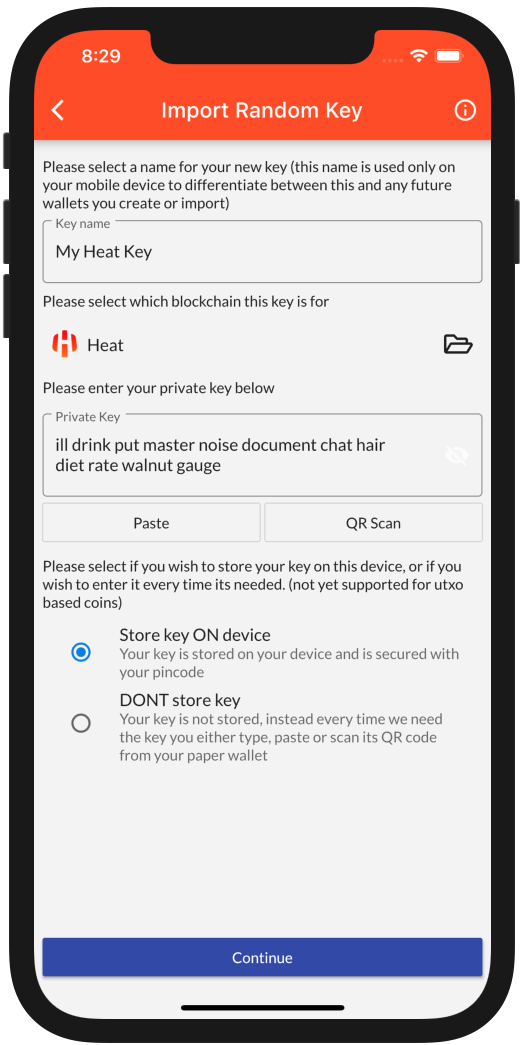
Assign a name for your wallet (which can be changed later), select the blockchain, and enter the private key either type, paste, or scan a QR code.
Store as Hot or Cold wallet
Non-utxo coins (not derived from Bitcoin) support storing your private key on or off your device. Not storing your key on your device offers improved security but requires you to enter your private key to send transactions.
With Heat Wallet you can keep your keys offline yet still have a (almost) fully functional wallet on your device. You will see your balances and history but will not be able to spend your crypto until you provide your private key again. One especially convenient and secure way to do this is if your private key is in the form of a QR code which you can scan on demand whenever you make payment.
WIF keys (Bitcoin, Litecoin, Bitcoin Cash)
Private keys for Bitcoin, Litecoin, and Bitcoin Cash often are in WIF (Wallet Import Format) form. This key compression mechanism has to be unpacked in this version of Heat Wallet still. To unpack a WIF key simply click the Convert button that appears.
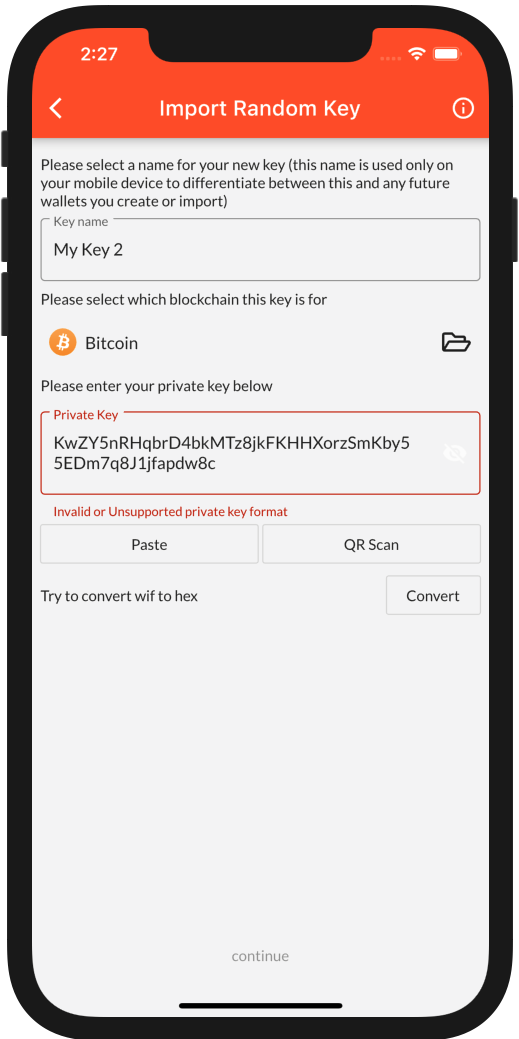
Once the WIF key is converted you can continue importing the same key but in its unpacked hex form.
4.3 - Import Heat Secretphrase
Do you have a HEAT secret phrase? Please read how to import your HEAT into Heat Wallet.
If you own HEAT which is kept in a so called secret phrase (pretty much any HEAT key not created with this wallet app) you need to import this through the Import Private Key dialog.
Make sure you select Heat as the blockchain as shown below.
Go to Import Private Key
When you click Continue a wallet will be created for your HEAT secretphrase.
4.4 - Import Paper/Digital Wallet
Keep your sensitive keys offline on paper or in digital form.
A unique feature of Heat Wallet is that you can store your keys outside your mobile device.
We offer a tool to both create new multicoin recovery seeds as well as import both multicoin seeds as well as private keys.
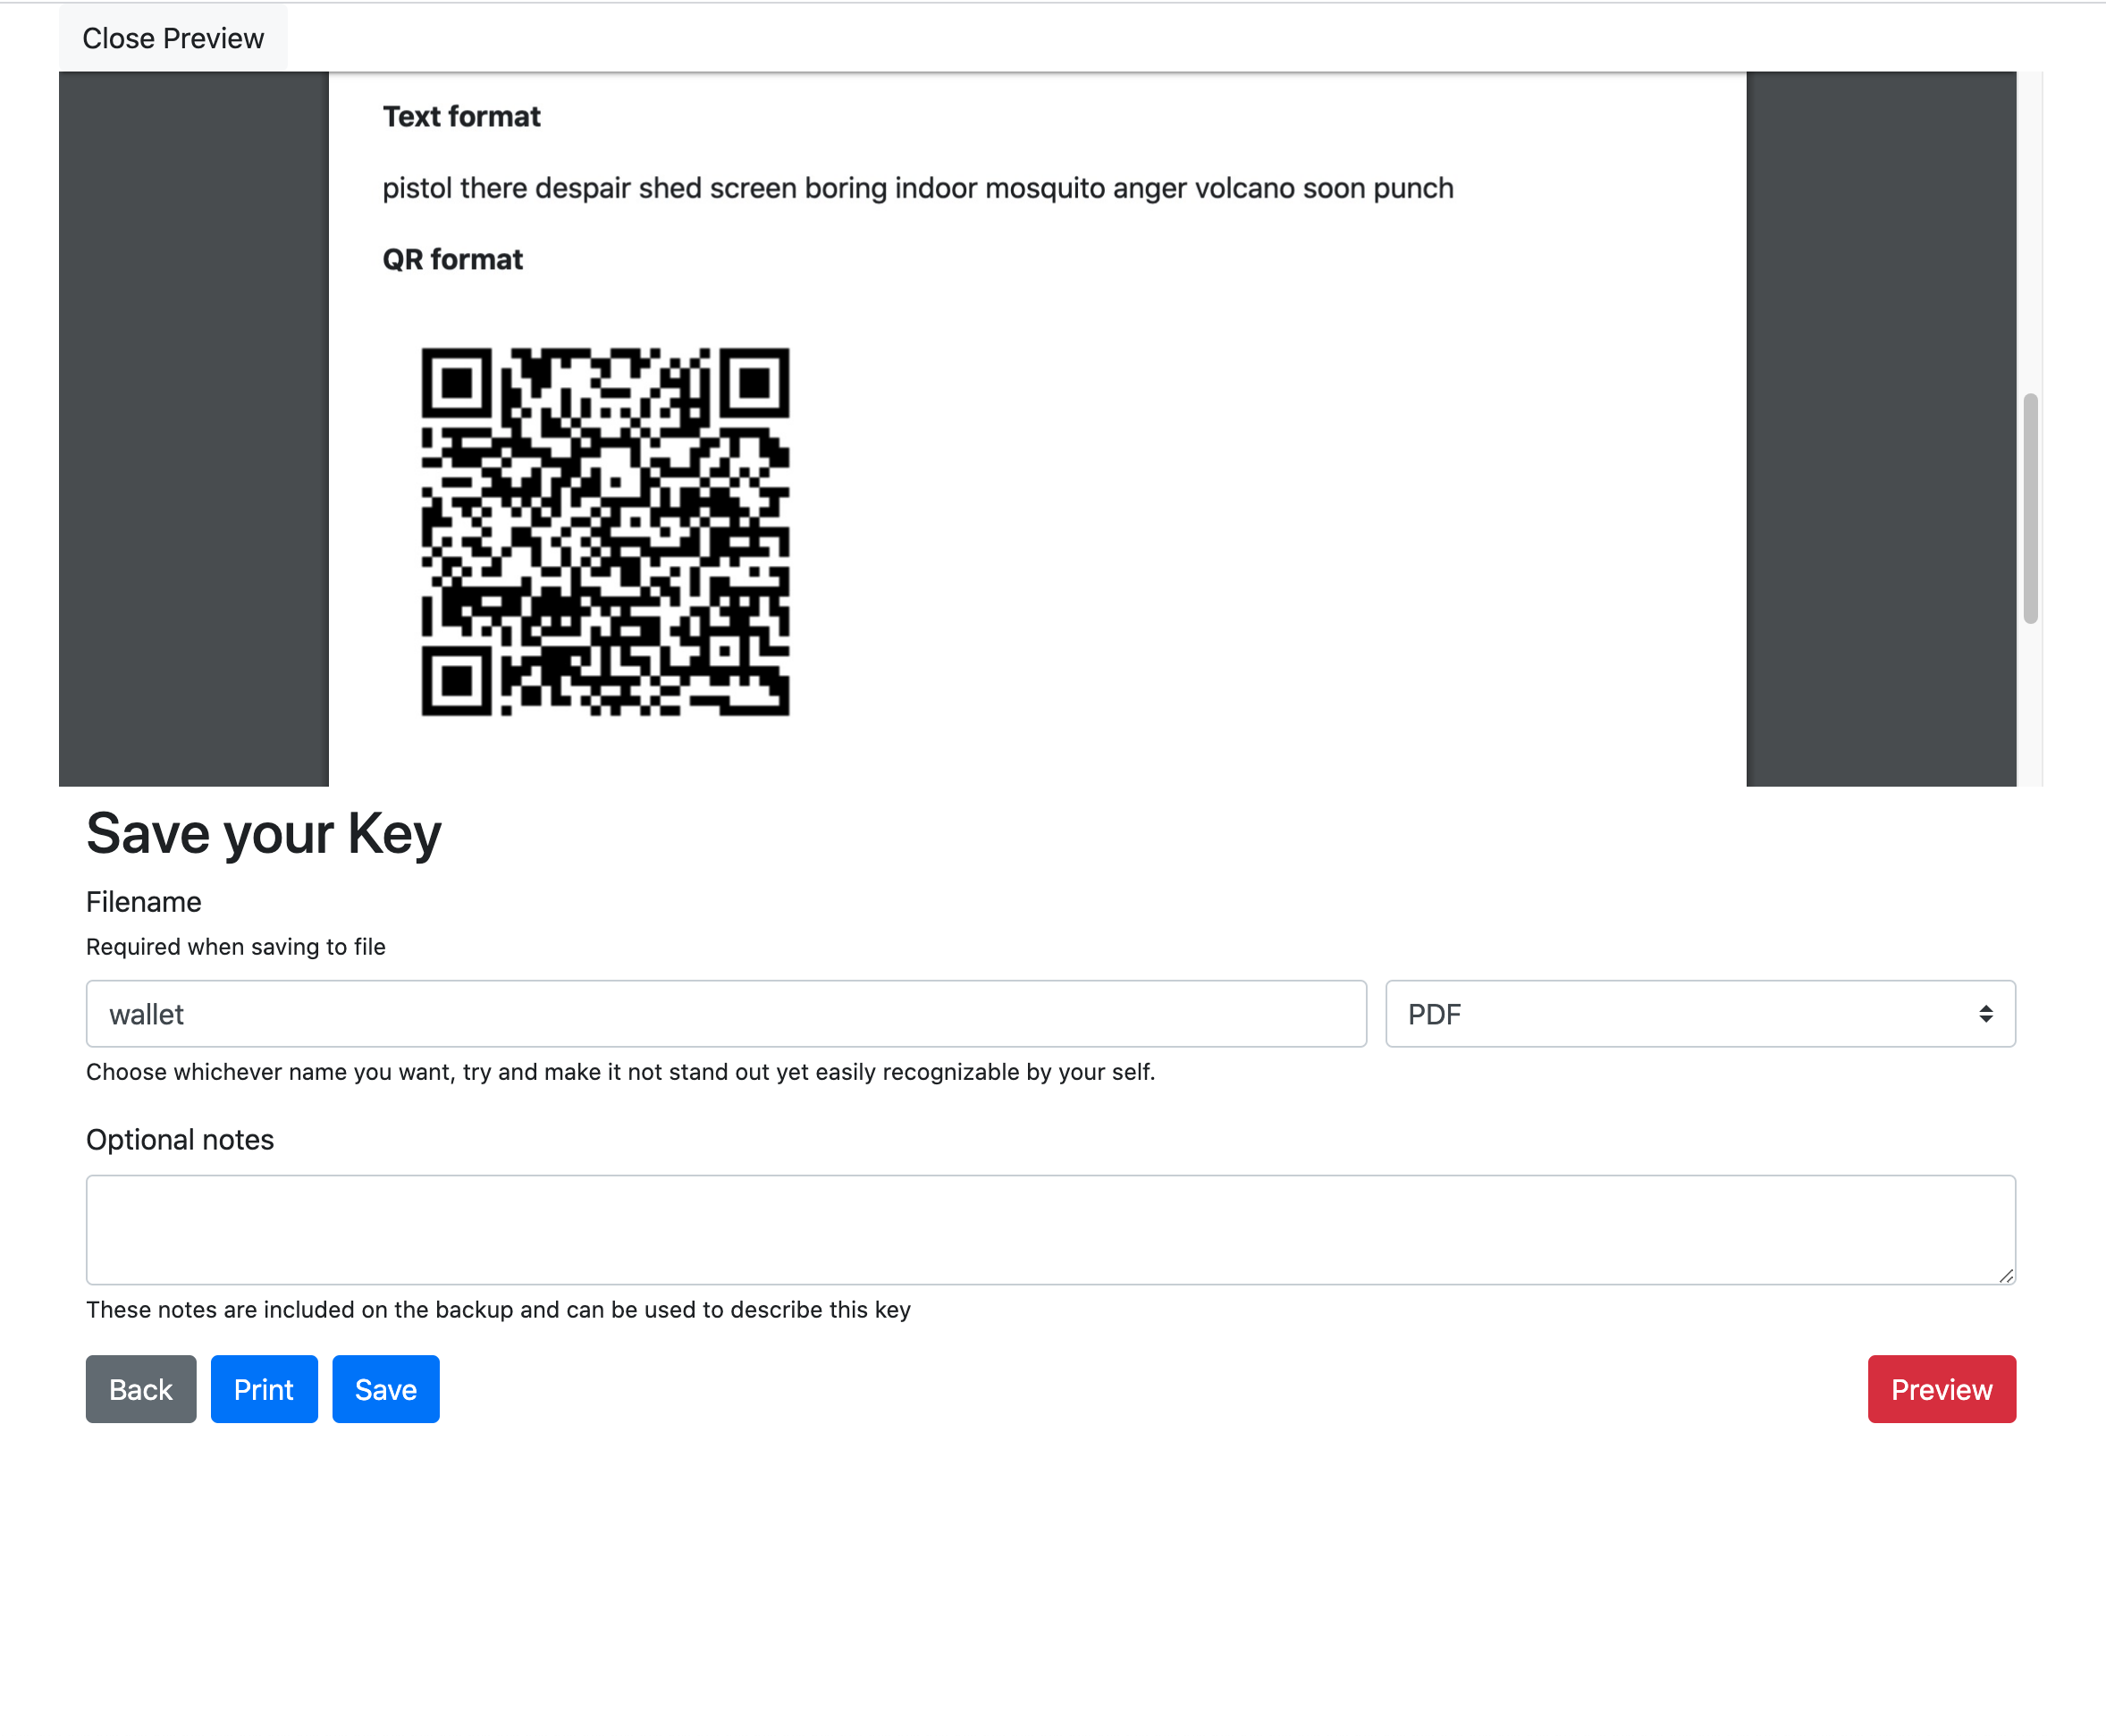
Paper Wallet
To use the paper wallet we suggest you download it to your computer, once downloaded double click the HTML file so it opens in your browser.
There are two options available.
- Create a new multicurrency recovery seed
- Enter an existing recovery seed or private key
Either way you would now either download the pdf file and save this to your computer or you would print out the pdf file to paper.
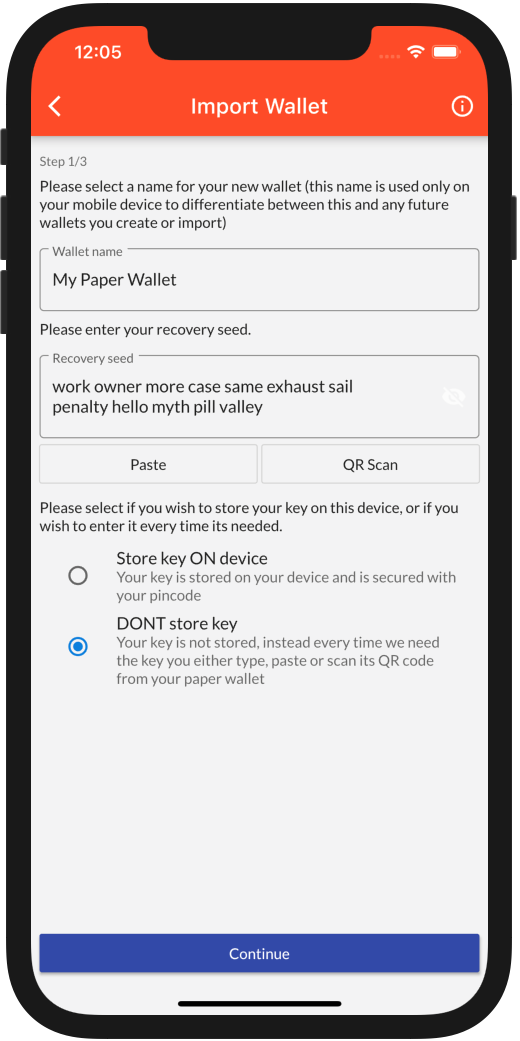
Start at the Action Center
To import your paper wallet you have to navigate to the Action Center if your paper walet contains a private key select Import Private Key if it contains a recovery seed select Import Recovery Seed
To access the
Action Center: first-time users automatically start with theAction Center. Users who created or imported a wallet will have to navigate to the Home screen where they see the menu button on the top left. Open the menu and select the top entryWallets, in the next screen click the plus at the top right to access theAction Center
Cold Storage
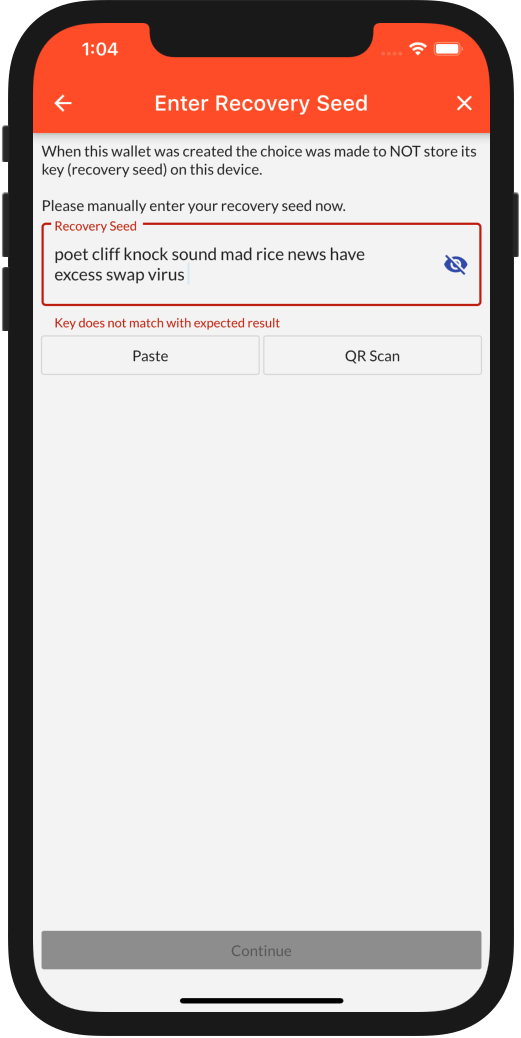
When importing your recovery seed or private key it is important that you select DONT store key this is shown below.
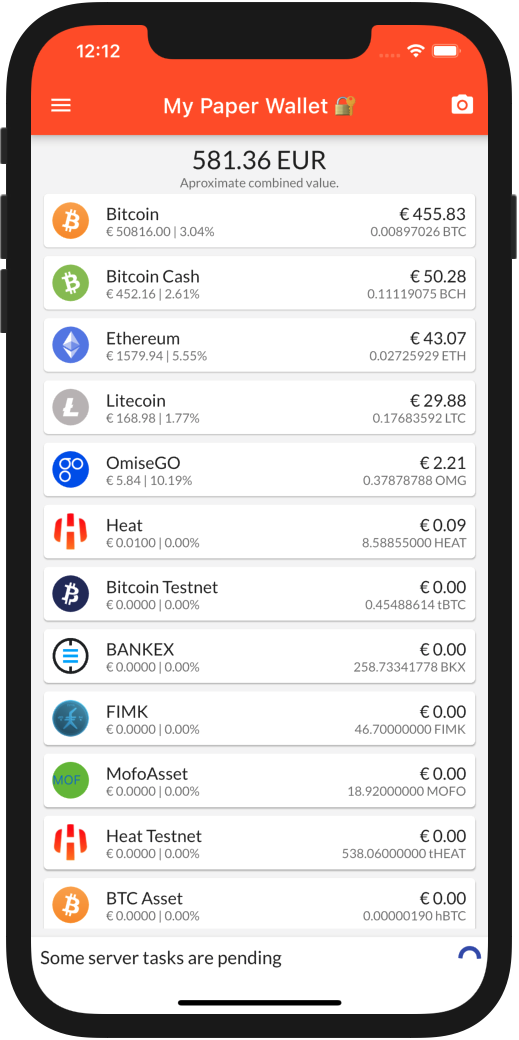
Now when we visit the home page of your new wallet it will display a small lock icon next to the name of the wallet (shown below at the top of app page in the title bar)
When trying to send a payment with this wallet you are asked to enter your recovery seed or private key. With a paper wallet you would scan it’s QR code by pressing the QR Scan button
In case you enter the wrong key you are warned about this. Heat Wallet knows its the wrong key as we have stored a cryptographic hash of your original key, your actual key is never stored when you created a wallet with DONT store key.
4.5 - Import Any Address
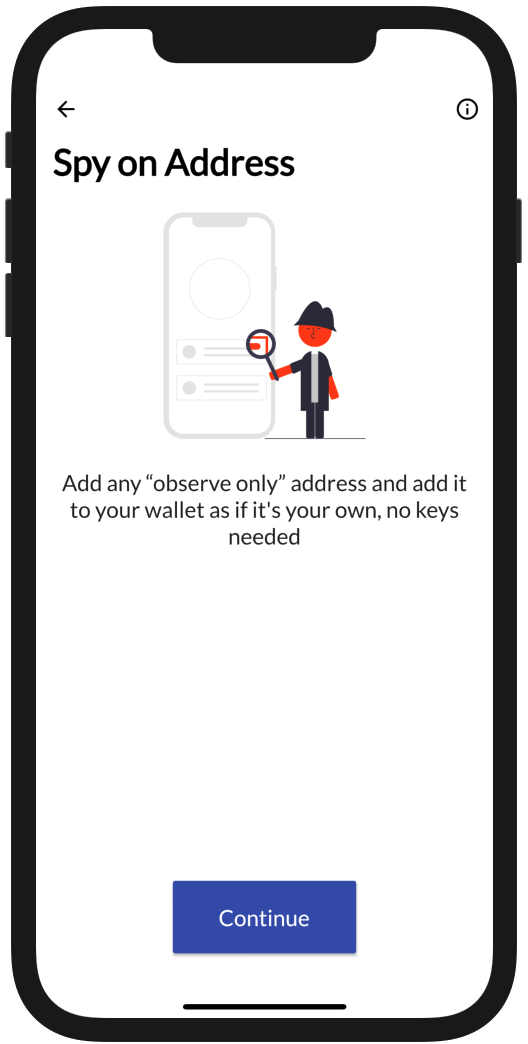
Import any address on supported blockchains. Watch your own addresses in cold storage or any other address, no keys required.
Spy on any address whether its yours or not, follow its history, balance and realtime value from the comfort of your phone.
Start at the Action Center
To import an address you have to navigate to the Action Center from there select Spy on Address
To access the
Action Center: first-time users automatically start with theAction Center. Users who created or imported a wallet will have to navigate to the Home screen where they see the menu button on the top left. Open the menu and select the top entryWallets, in the next screen click the plus at the top right to access theAction Center
Spy on Address
You are presented with an information screen, click the small button at top right for more information, click Continue to import your address.
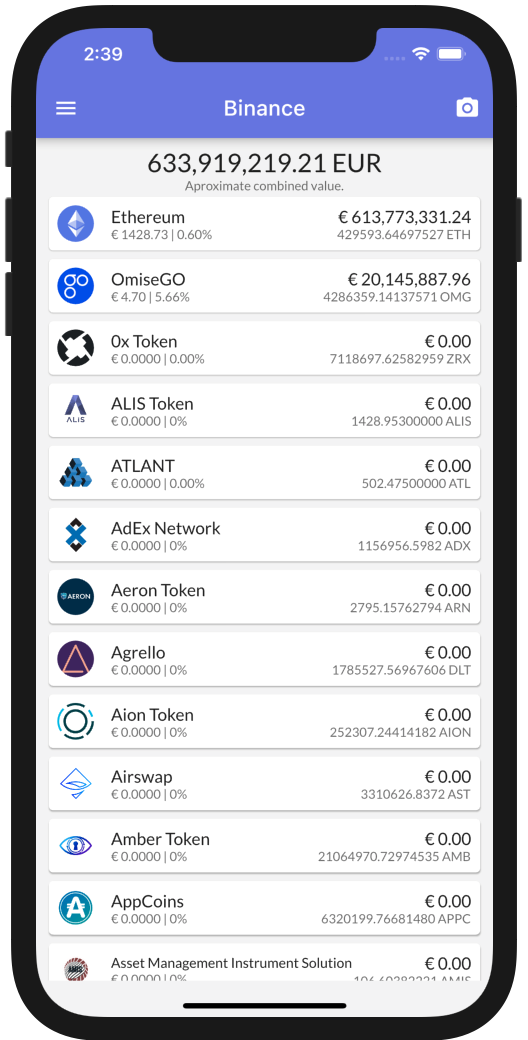
Addresses are Blue
Notice how the title bar is colored blue for spy on address wallets
Next we give an optional name to our new wallet and select the blockchain, with the blockchain in place we can type, paste or QR scan the address which will be validated to be a valid address for that blockchain.

When we click Continue a new wallet is created that shows us the balances of the address we just added (in this case its one of Binance its addresses).
5 - Add new currency to existing wallet
Read how to add new currency types to an existing wallet.
Currently on wallets based on recovery seeds allow you to add a new currency to an existing wallet.
Recovery Seed Wallets
Wallets based on recovery seeds can contain any number of currencies, when you imported or created the wallet you were given a choice of which currencies to add initially.
Adding Currencies
To add a new currency we navigate to the home screen (first screen). From the menu, we choose the Add Currency option.
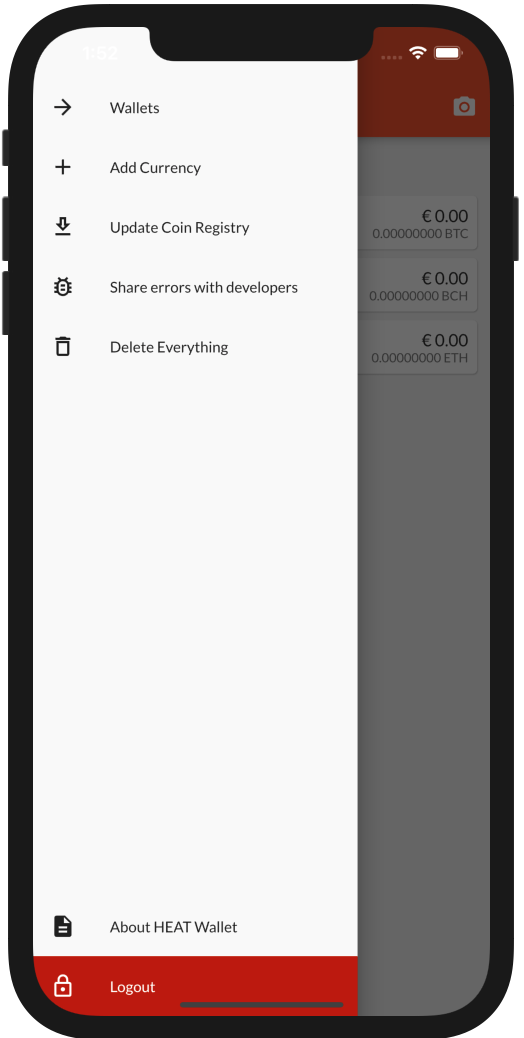
Once the Add Currency screen opens we are shown a list of possible currencies to add to your wallet.
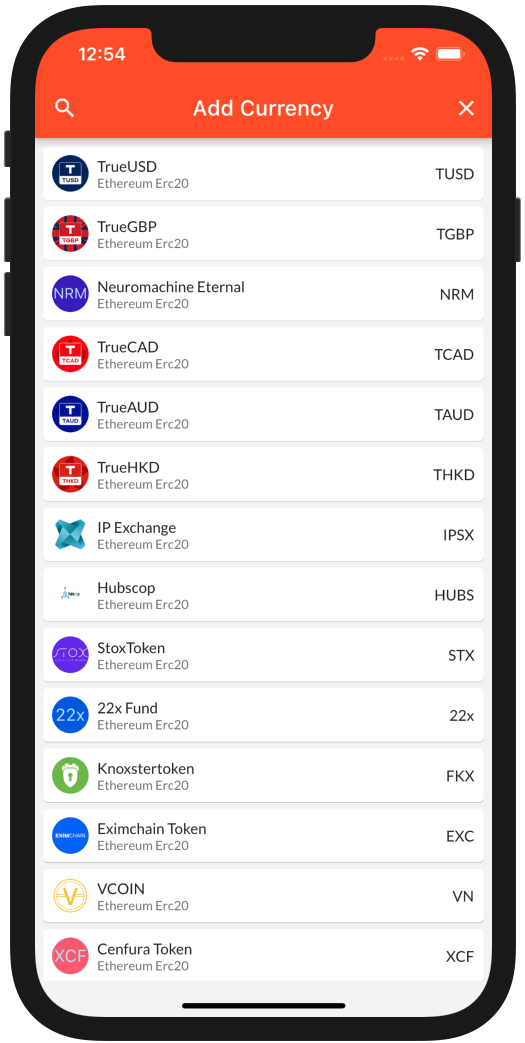
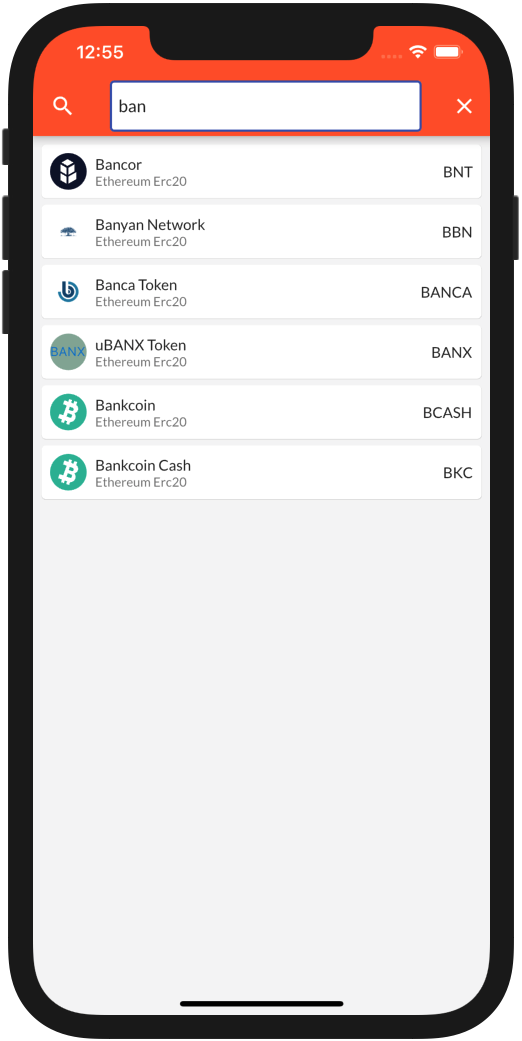
To quickly find a currency tap the search icon at the top left, a search textbox will appear in which you can type and filter the list to your specific currency.
Tap on the currency of choice and possibly you have to enter your pincode if no currency of that same blockchain was added to your wallet yet.
6 - How to start receiving crypto
How to start receiving crypto currency to your new or existing wallets.
Before you can start receiving crypto currency, for any blockchain (or currency) you must have an address and accompanying recovery seed or private key.
First You Need a Wallet
Maybe you don’t have an address yet or wish to create a new one, in that case please follow the steps in the link below to create a new wallet.
Create New Wallet
When you already have a recovery seed, private key or HEAT secret phrase please select one of the options below.
Import Recovery Seed
Import Private Key
Import Heat Secretphrase
Finding Your Address
For each currency in your wallet you will find one or more addresses belonging to you. To access your address do the following:
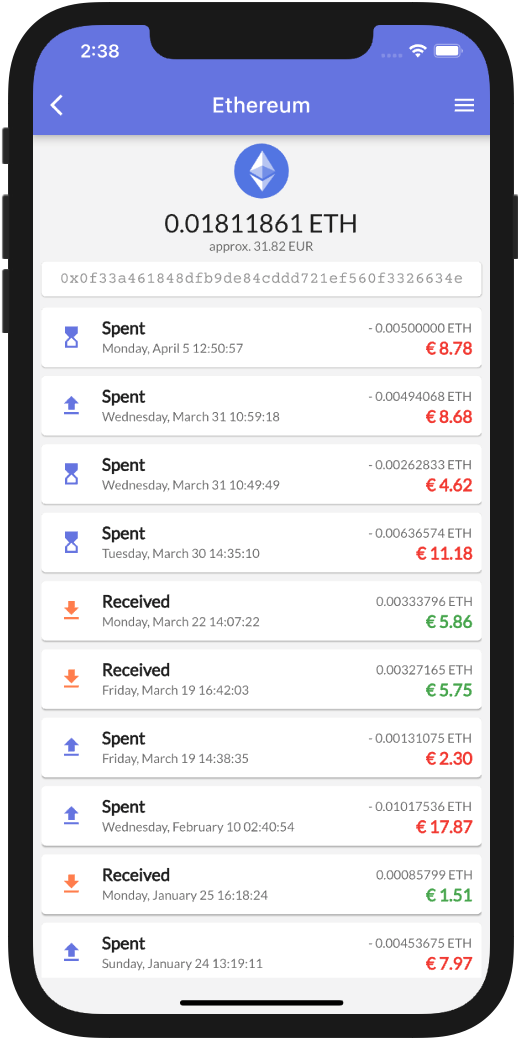
From the home screen (the one that shows your wallet name at the top) click on the currency/blockchain you want to find your address for. You should go to that currencies page (below is the Bitcoin page as an example)
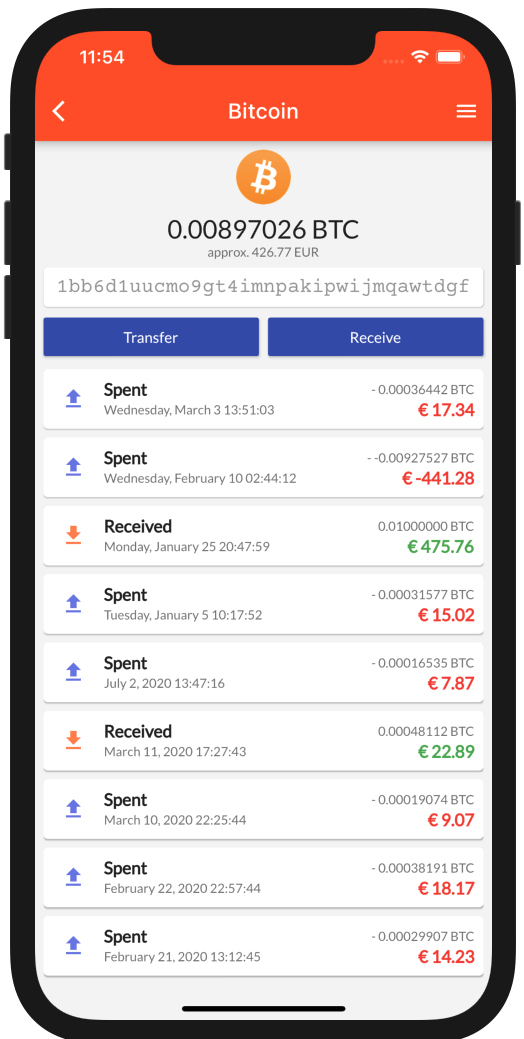
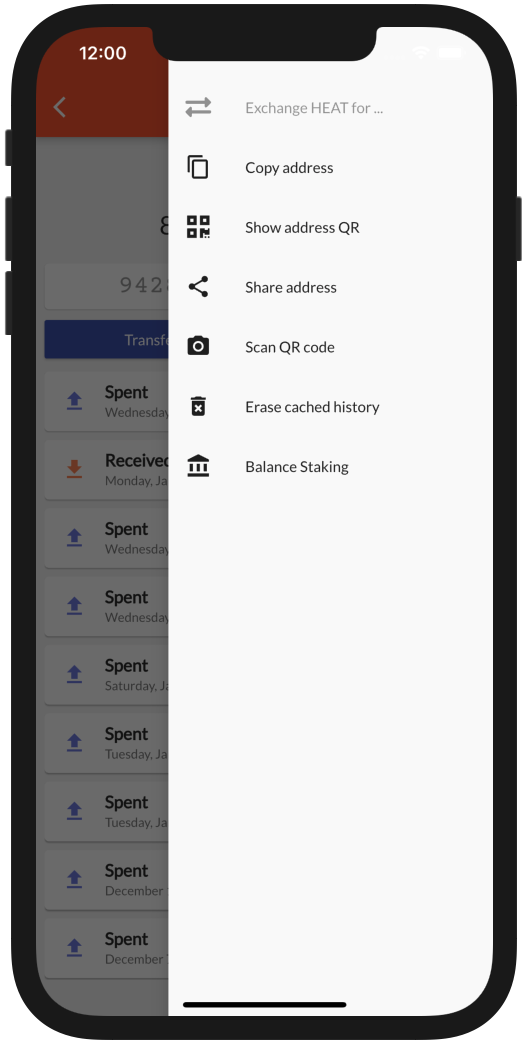
You have several options to access your addresses. On the screen above if you would click the menu button on the top right you could:
- Copy your address
Copy address(copies the address to your clipboard so you can paste it in another app) - Show address as QR code
Show address QR(allows someone else to scan your address as a QR code with their phone) - Share you address over email, sms, whatsapp or any other app through
Share adress
Receive Button
Next to the Transfer button you will find the Receive button on the screen shown above.
The functionalities are quite the same on the receive screen yet differ slightly. Where you would copy your raw address in the steps above, on the receive screen some meta data is added to your address in the form of a blockchain identifier. This meta data however is understood by most other wallet apps.
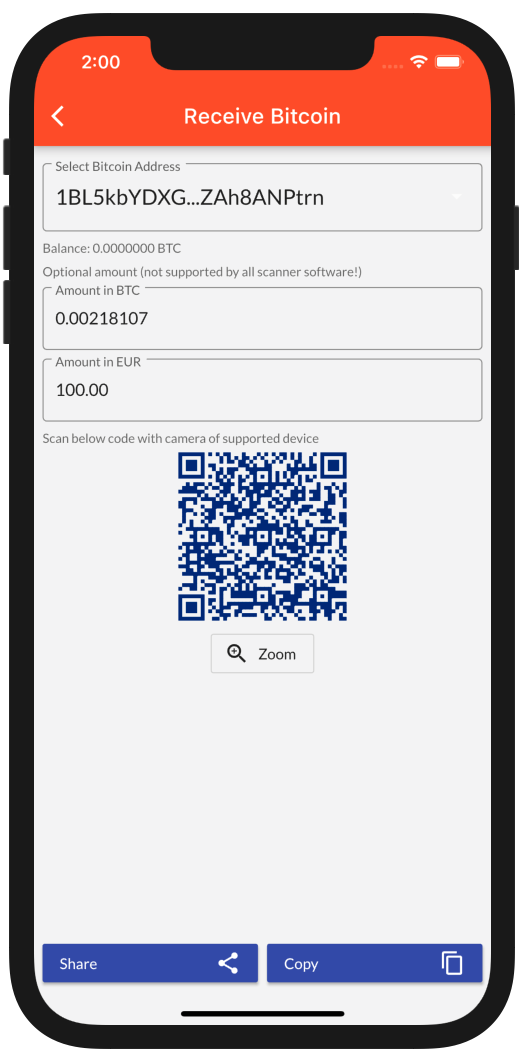
When you enter an amount to be received through the meta data most other wallet apps will pre-fill their amount inputs with the amount you entered in Heat Wallet.
7 - How to start sending crypto
How to start sending crypto currency from your new or existing wallets.
Before you can start sending crypto currency, for any blockchain (or currency) you must have an funded address and accompanying recovery seed or private key.
First You Need a Wallet
Maybe you don’t have an address yet or wish to create a new one, in that case please follow the steps in the link below to create a new wallet.
Create New Wallet
When you already have a recovery seed, private key or HEAT secret phrase please select one of the options below.
Import Recovery Seed
Import Private Key
Import Heat Secretphrase
It is important that your sending address is properly funded, this sometimes means that while a balance shows up for your address yet you can’t spend the funds yet as the transfer to your address has not been properly confirmed on the blockchain. In this case just wait longer depending on the blockchain. Your address history should indicate if a transfer is unconfirmed.
Crypto currencies or tokens can be send from your personal address(es) to any other valid (and supported) address on that same blockchain.
Select your Currency
To send any cryptocurrency we first select this currency from the home screen.
Transfer
Click the Transfer button.
Recipient and Amount
Payments involve a recipient address, and an amount.
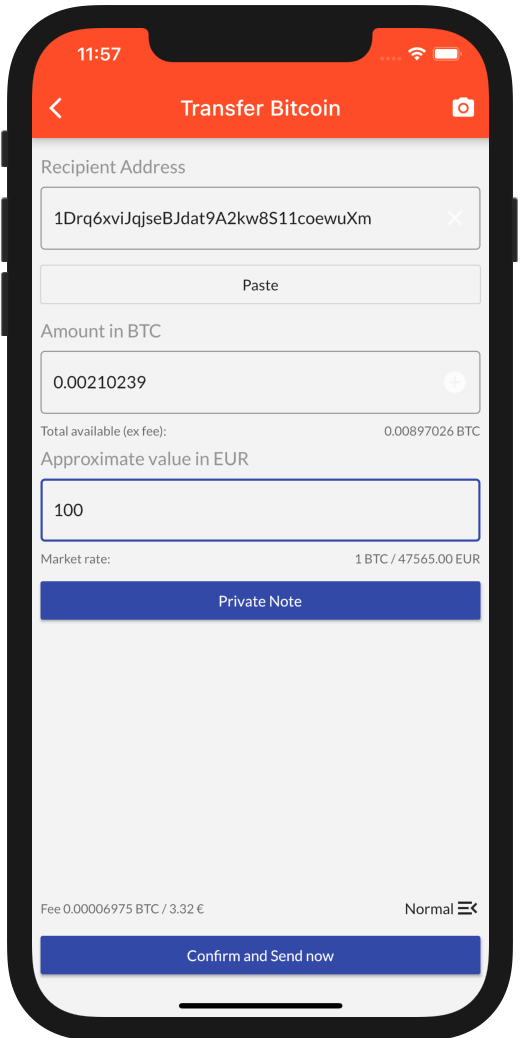
Custom Fee
Bitcoin type currencies as well as Ethereum allow us to set a custom fee price, based on how busy it is on the blockchain at any time your fee can be higher or lower. We provide you with efficient real time fee price ranges for you to choose from.
To adjust the fee click the line with fee info at the bottom of the screen.
Custom Bitcoin Fees
For Bitcoin, Bitcoin Cash and Litecoin we can adjust the Fee per byte value. This says how much fee you pay per byte measured as the size of your transaction. You can select one of the predefined values or even enter a custom value if you know what you are doing.

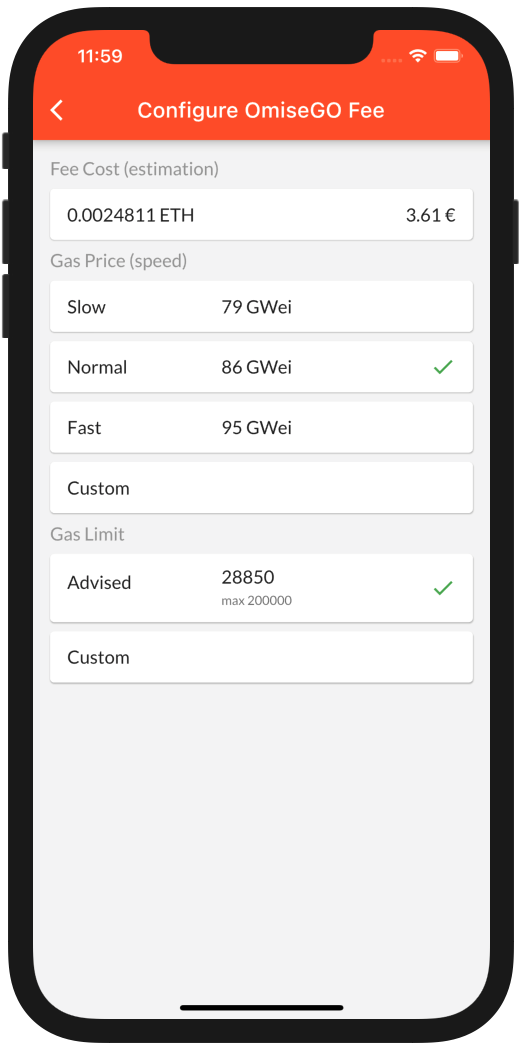
Custom Ethereum Fees
For ethereum we can adjust both the gas price as well as the gas limit. We test run your transactions on our servers in an Ethereum virtual machine to measure the actual gas that would be used. This is how we are able to provide a detailed fee cost estimation for all Ethereum and Erc20 transactions. If you know what you are doing you could change the gas limit if you wish.
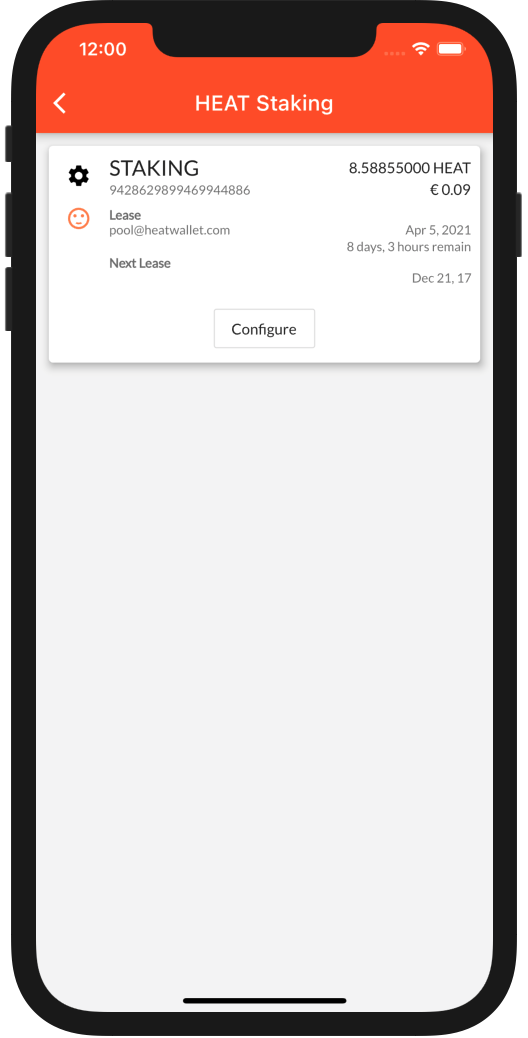
8 - How to start staking
How to start staking, or leaseing your balance, to earn passive income.
You can lease your Heat balance to a leasing pool and earn a passive income in the form of a share of the pool rewards.
To start staking go to your Heat currency and open the menu on the top right, from the menu select Balance Staking
Configure
You are presented with an overview of your current staking settings. Click Configure to change these settings.
Complete your Stake
A three step process allows you to stake your Heat balance.
First we select your address.
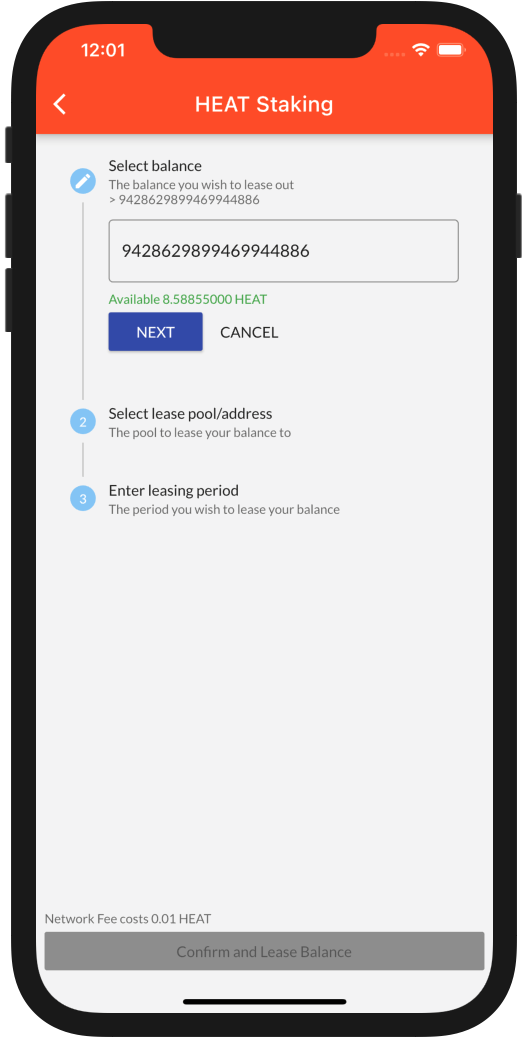
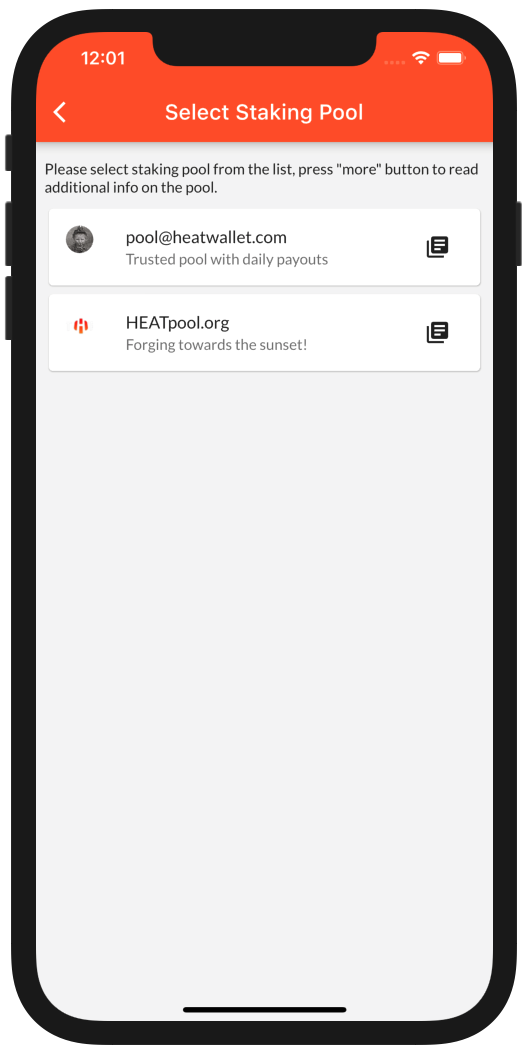
Next we select a staking pool (or enter a custom address)
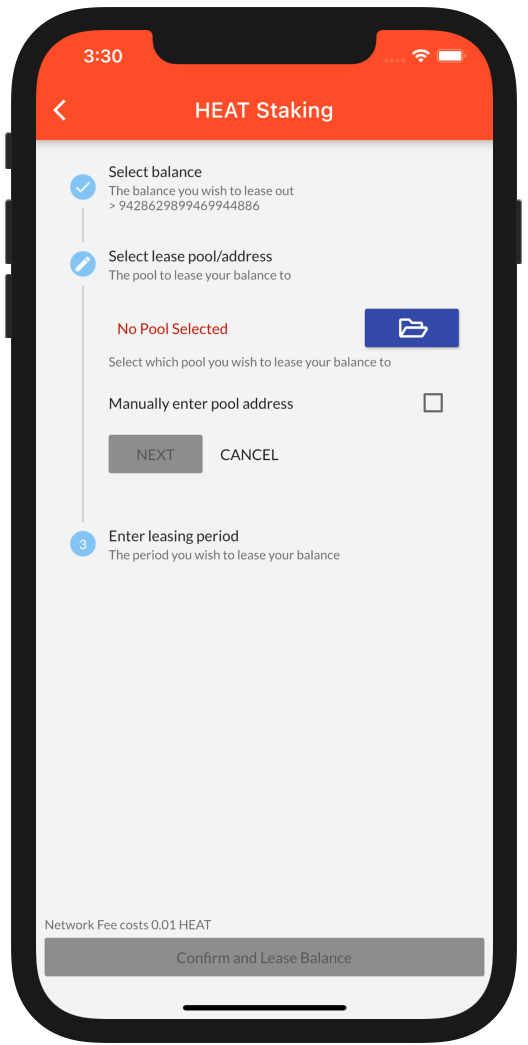
Click the blue button to show a list of available stakers
Finally choose a duration
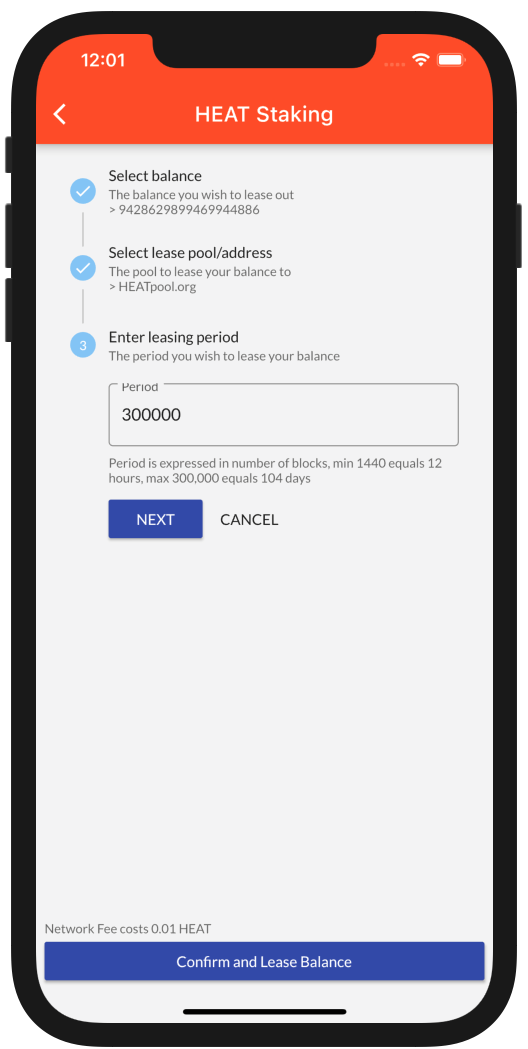
You should now have staked your balance. Visit the first page above again to see your staking status.
9 - How to do an Airgapped Broadcast
How to do an Air-Gapped broadcast with ‘crypto swiss knife’ and Heat Wallet
Airgapped broadast allows you to keep your private keys secure and offline.
The idea is that on one device you store or enter your private keys plus a local copy of https://cryptoswissknife.com/.
It’s important that you don’t connect this device to the internet again
Supported blockchains at this stage
- Bitcoin
- Ethereum
- Heat
- Bitcoin Testnet (for trying out)
On your mobile device, you would install Heat Wallet
Get Crypto Swiss Knife
Download https://cryptoswissknife.com/ to your local machine and transfer it to your Air-Gapped device.

Tips to do so are:
- Download the archive to your PC/Laptop
- Unpack the archive
- Transfer to USB stick
- Place USB stick in Air-Gapped device (either mobile or desktop)
- Copy cryptoswissknife.com files from USB to Air-Gapped device
Install Heat Wallet
Click above and read how to install Heat Wallet.
Using Crypto Swiss Knife
Go back to your airgapped device and open the downloaded crypto swiss knife in your browser.
Depending on the selected crypto currency you will have to provide different data.
Ethereum extra Data
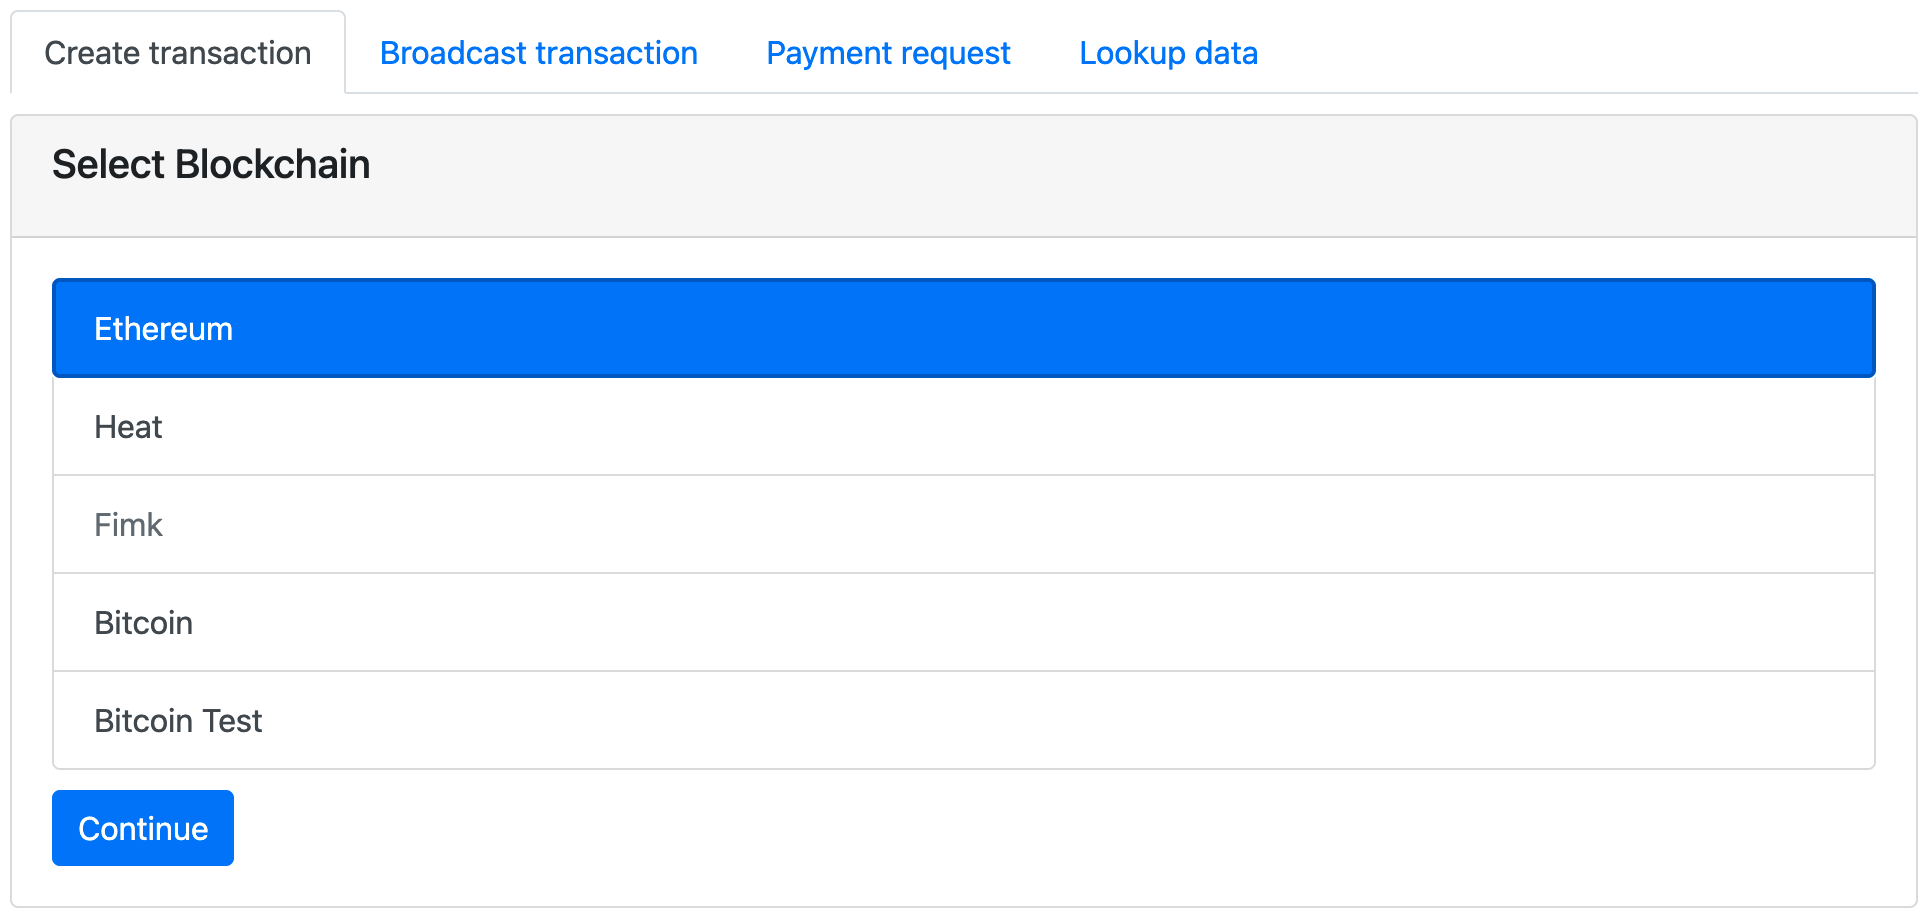
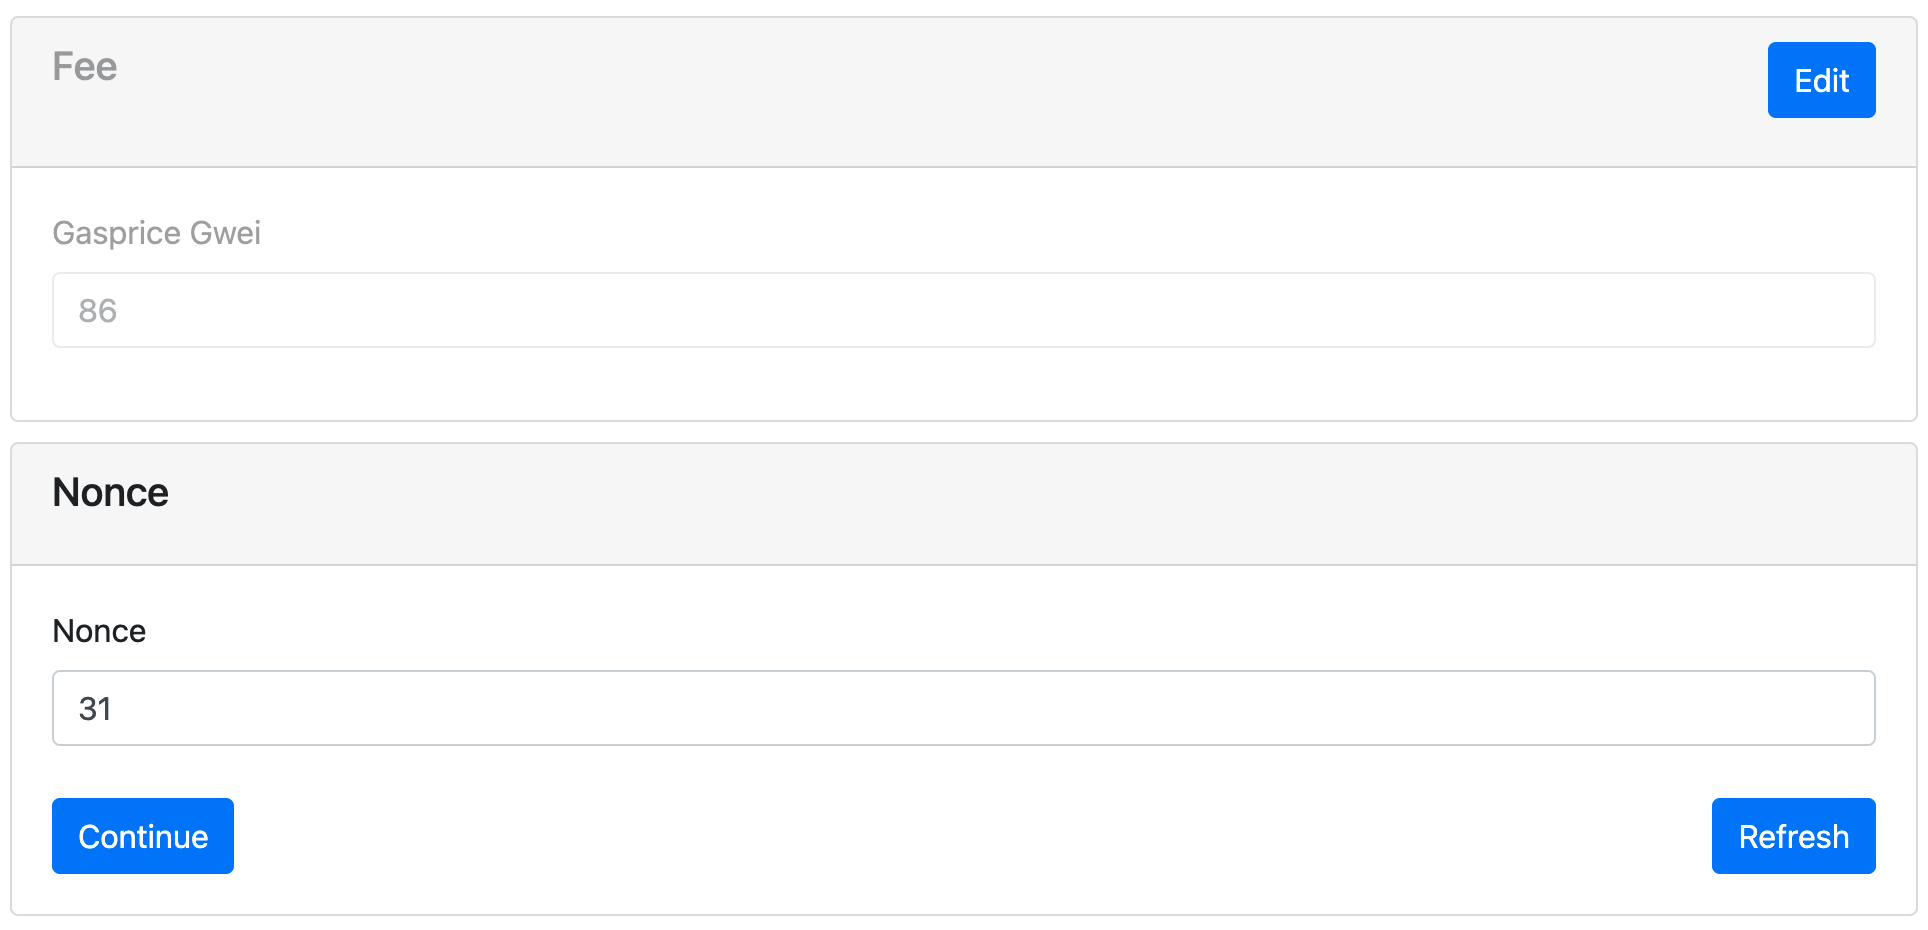
Ethereum transactions require us to provide Gas price and Nonce to assist you in finding this data you would go to https://cryptoswissknife.com/ on a connected device and select the Lookup data at the top.
Now:
- Under
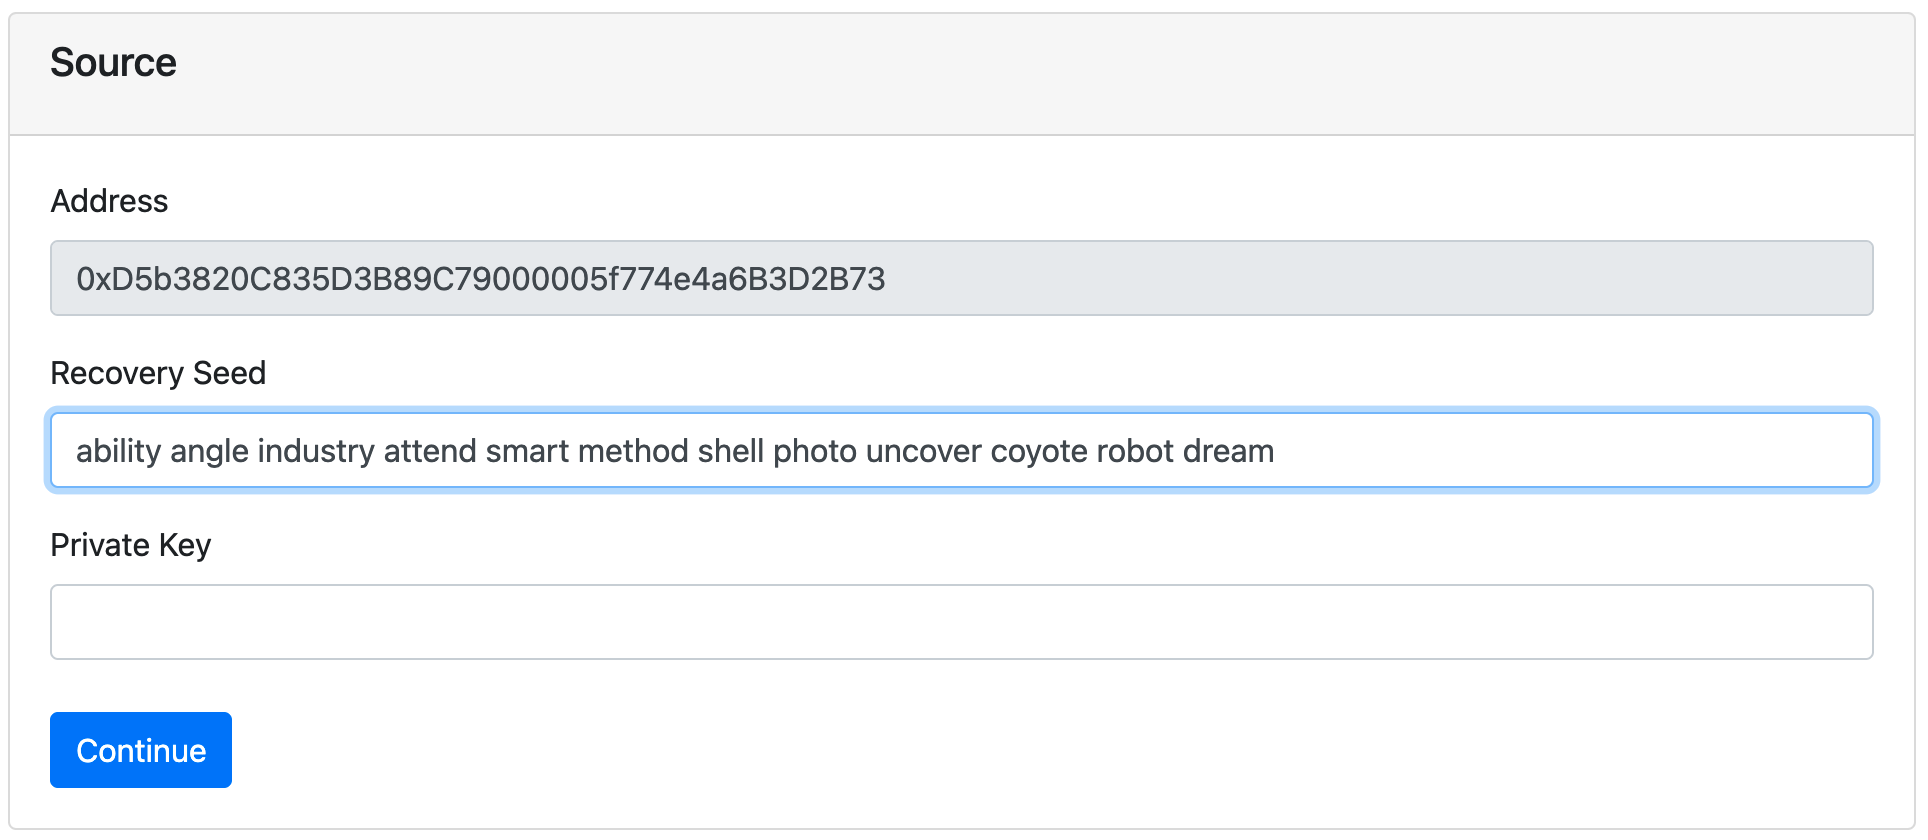
Select Blockchainselect Ethereum - Under
Sourceprovide your sender address (note that this can be safely done, use a VPN if so desired) - Now, you are presented with a real-time fee value, this data point has to be entered on the Air-Gapped device
- Now, you are presented with a real-time nonce, this data point has to be entered on the Air-Gapped device as well
Bitcoin extra Data
Bitcoin transactions require us to provide Satoshi per byte and Utxo data to assist you in finding this data you would go to https://cryptoswissknife.com/ on a connected device and select the Lookup data at the top.
Now:
- Under
Select Blockchain, select Bitcoin - Under
Source, provide your sender address (note that this can be safely done, use a VPN if so desired) - Now, you are presented with a real-time fee value, this data point has to be entered on the Air-Gapped device
- Now, you are presented with a real-time Utxo data, this data point has to be entered on the Air-Gapped device as well
Utxo data could be extensive and might require you to use a USB stick to transfer this to the Air-Gapped device
Select Blockchain
The first step is to select the blockchain on the Create transaction tab
Provide Private Key or Recovery Seed
Now either provide the private key or recovery seed. You can confirm your sender address as that’s automatically generated
Provide Fee, Nonce, and/or Utxo data
Now go to your networked device and on https://cryptoswissknife.com/ lookup the extra data for Ethereum or Bitcoin as described above. Enter that info on your Air-Gapped device (see example below for Ethereum)
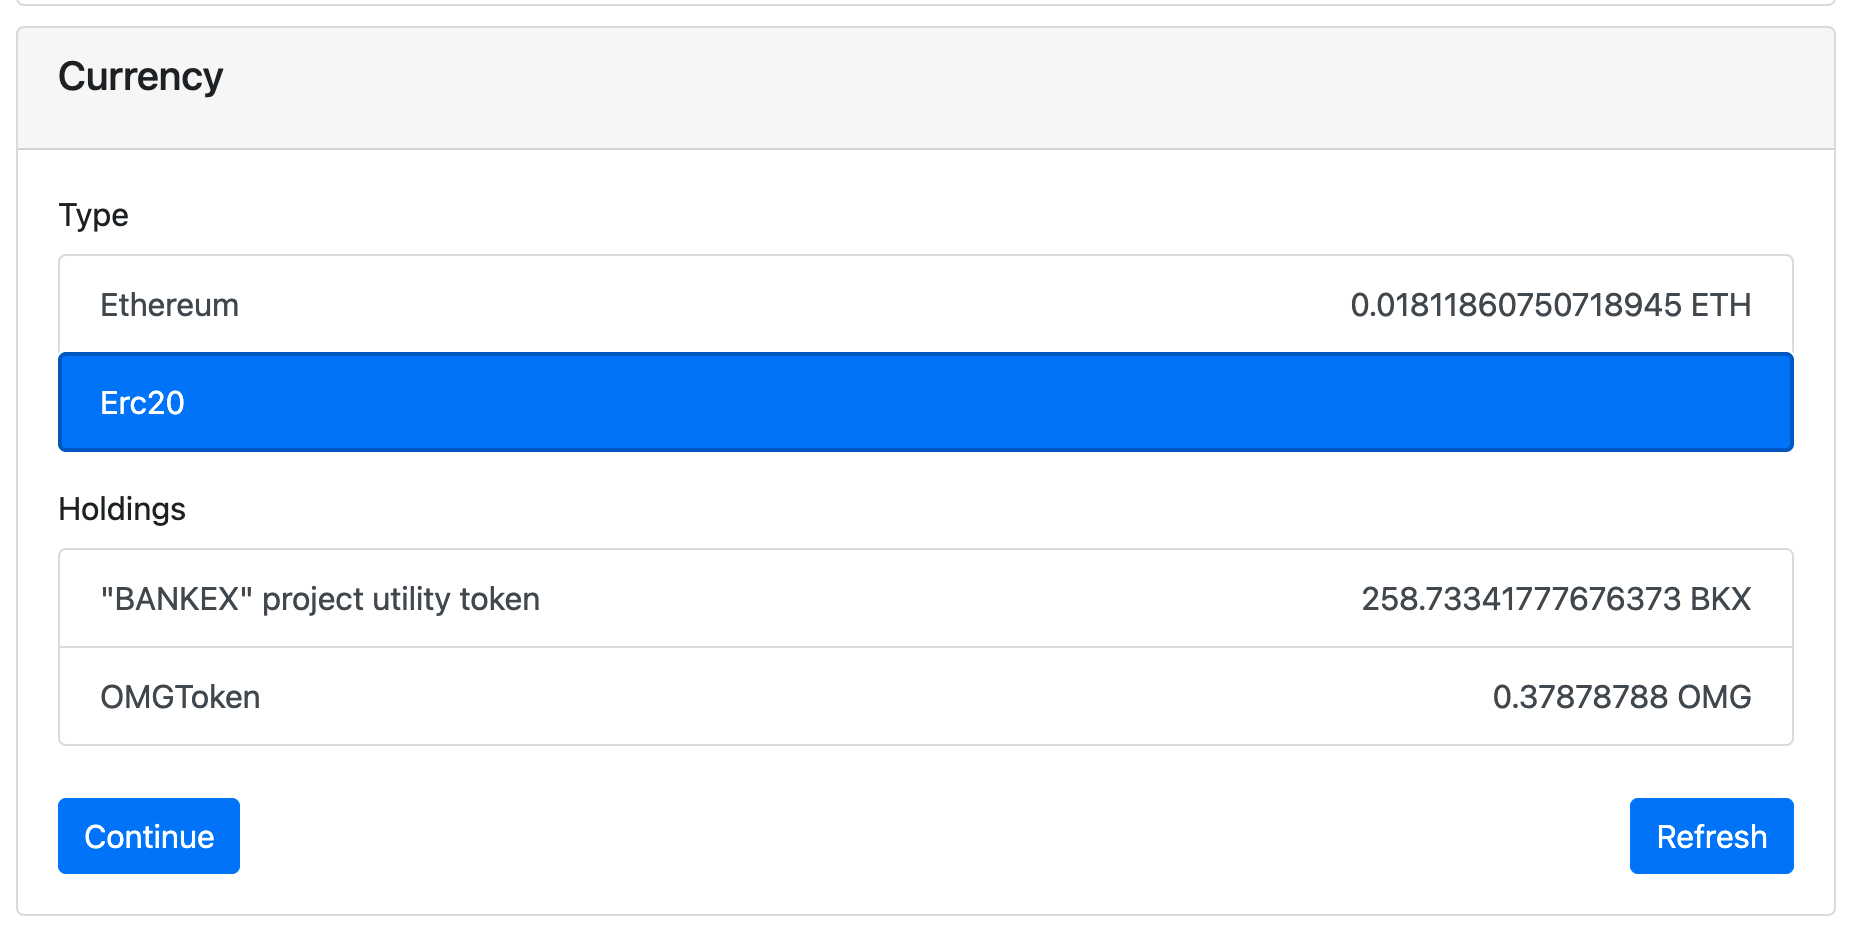
Select Currency
For Ethereum and Heat, we support sending native Ether or Heat as well as ERC20 tokens or Heat Assets. Either way, you have to select which currency you are sending.
Transfer Data
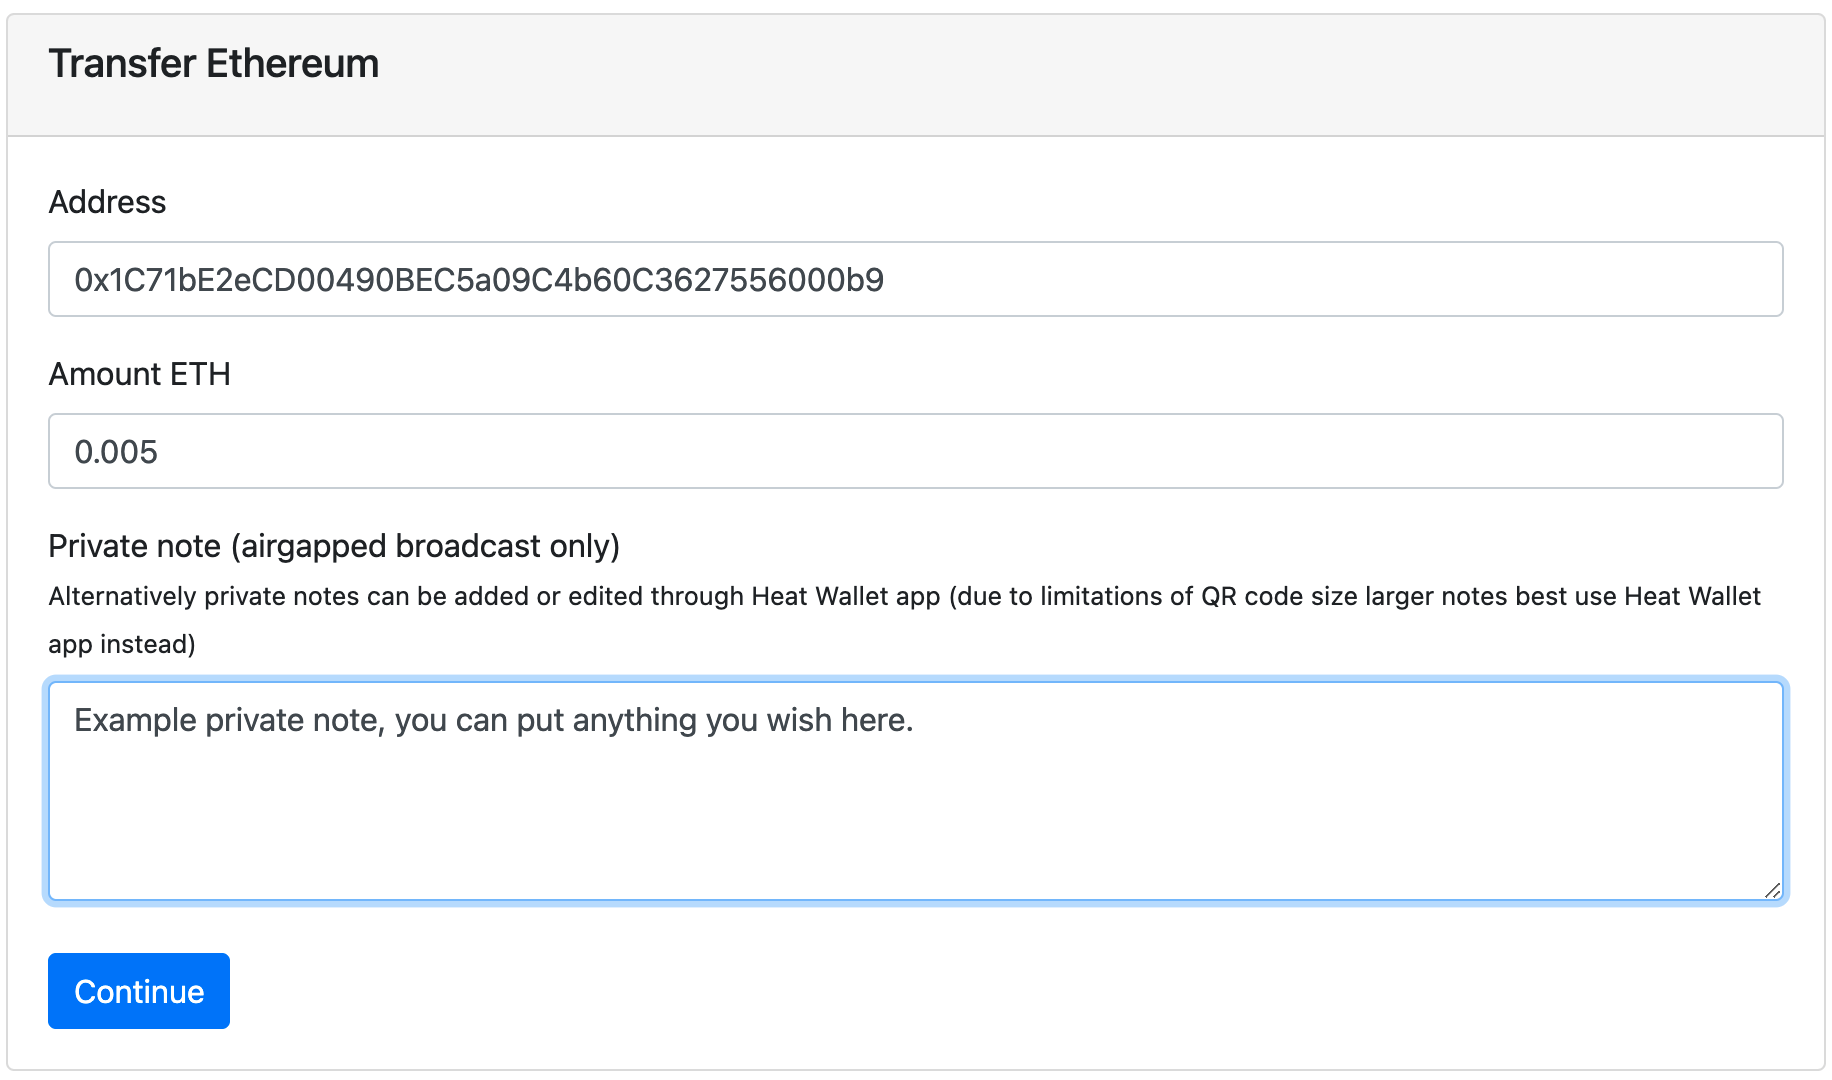
Now provide the recipient, the amount you wish to send, and an optional private note.
Private notes are a feature of Heat Wallet, they allow us to store data locally to your device only to track and describe your transactions
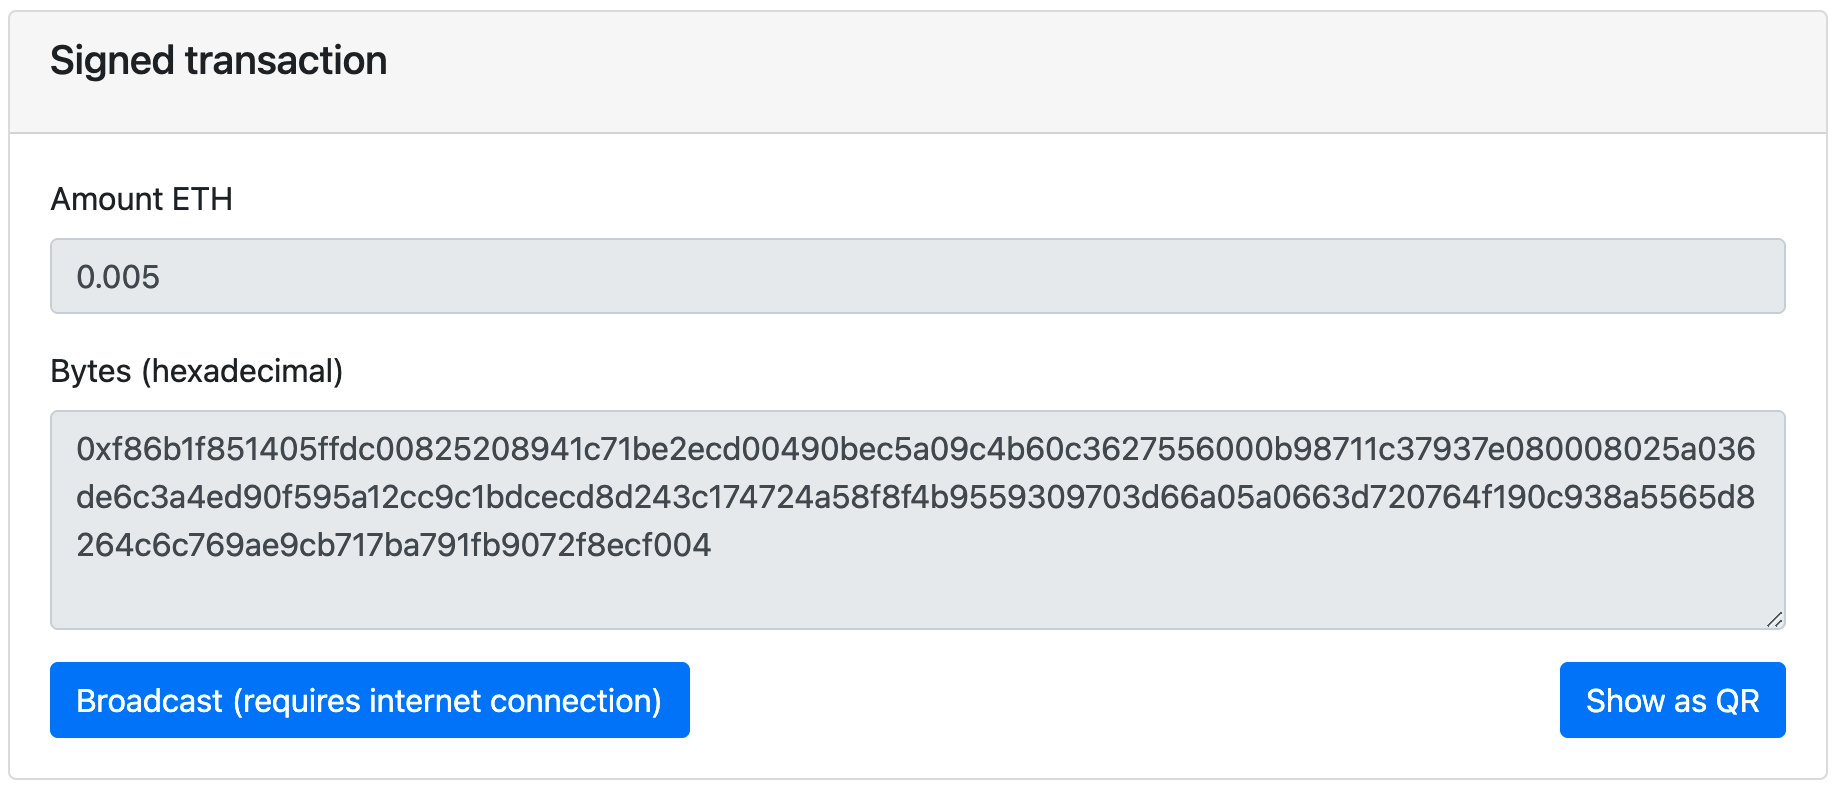
Signed Transaction
You are presented with the signed transaction in two forms:
- As a raw transaction, you would use a block explorer and paste this data in a form that supports sending raw transactions to a blockchain network (this is a free service normally - apart of course from the transaction fee costs)
- As a Heat Wallet Airgapped broadcast
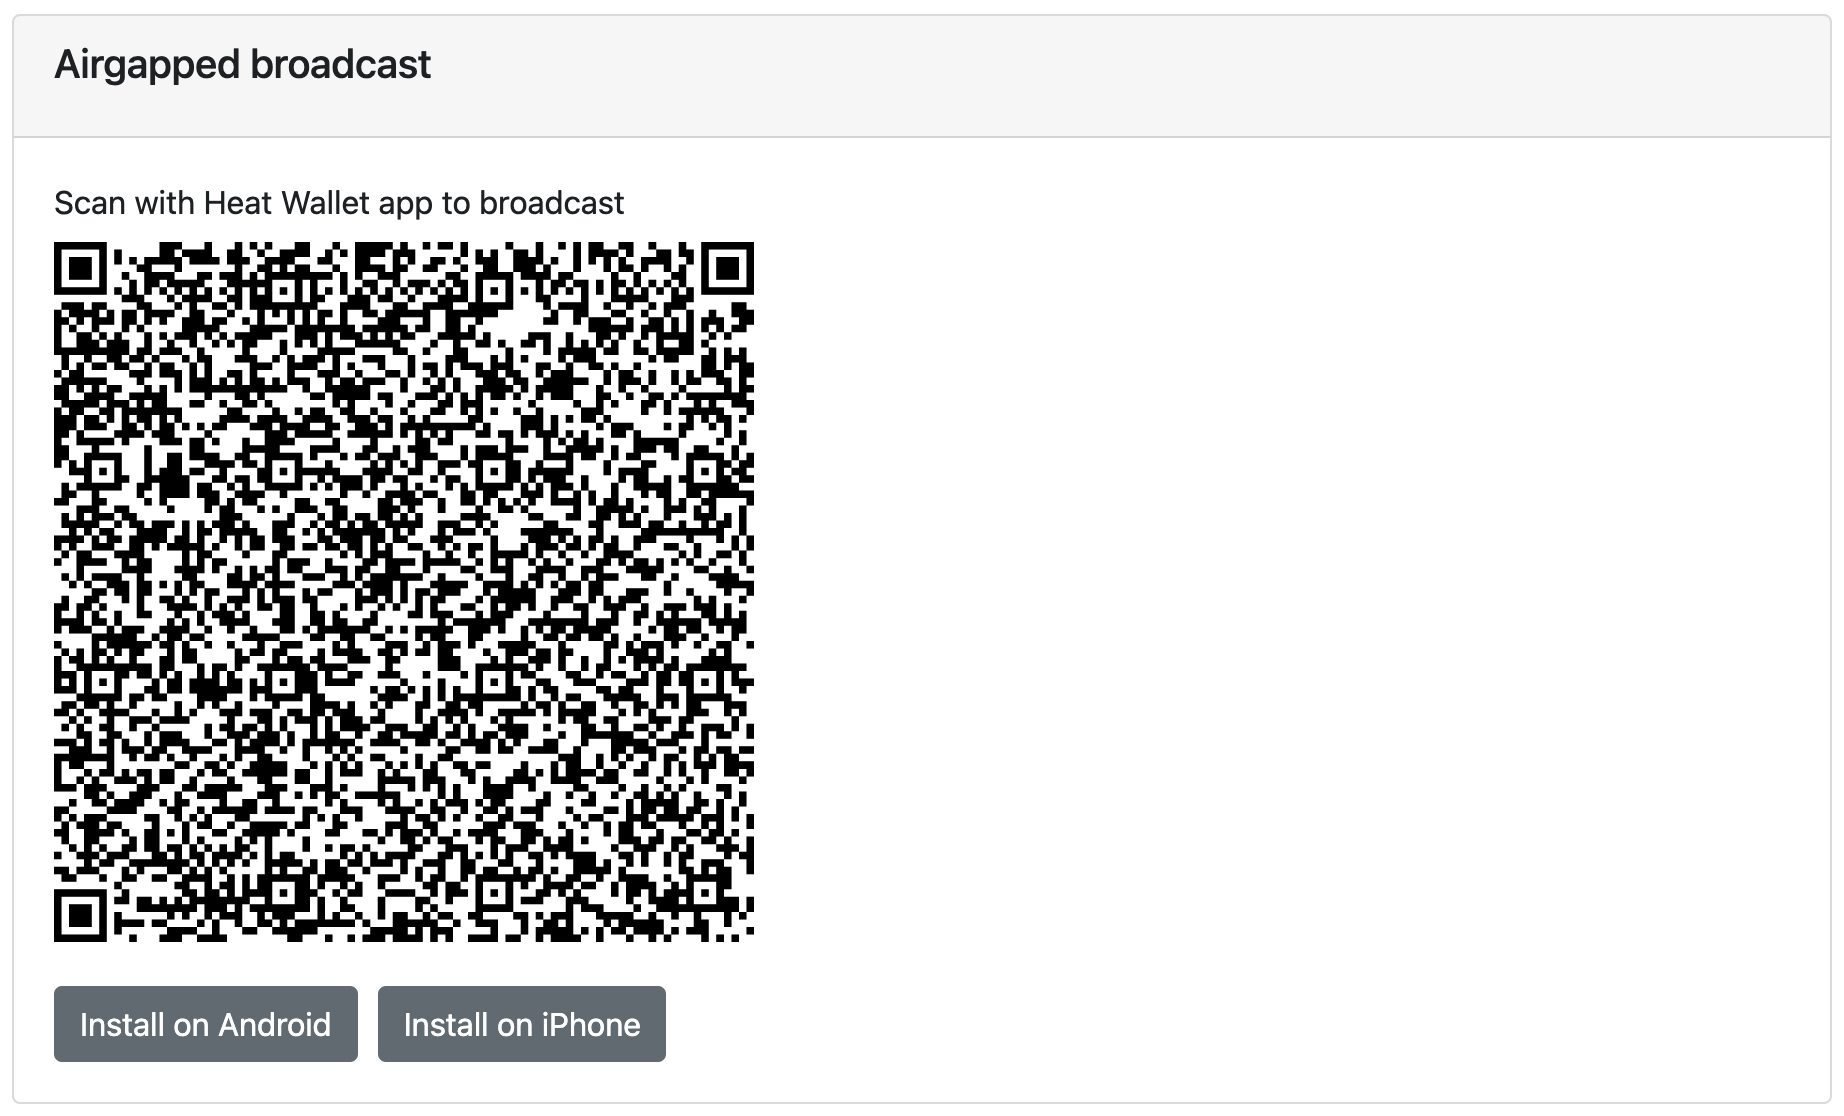
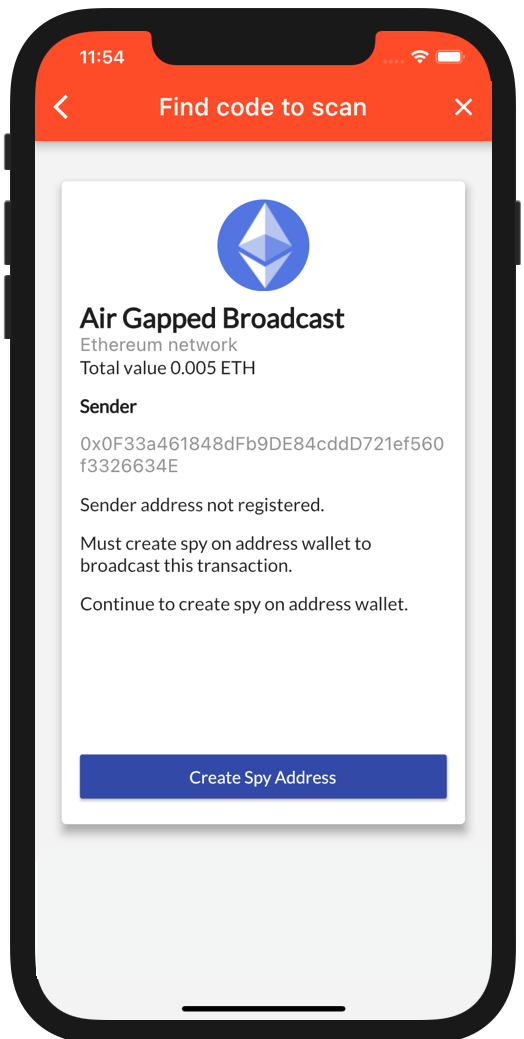
Airgapped Broadcast
Now if we would scan the code in the Airgapped Broadcast enabled phone we would be able to track both the sender address as a read-only address and trace the transaction status as well.
Either select
Air Gapped Broadcastfrom the action center. Or open the scanner with the button (top right) on the home screen of any opened wallet.
Go ahead if you have Heat Wallet, scan the code below and see how easy this is.
Once the scanner detects the QR code you are presented with a screen to complete the operation, if you don’t have a wallet for that sender address one will be created.
You should now be able to broadcast your transaction and follow its status.
You will be able to see your transaction and balance on your device, the keys to it however remain on your Air-Gapped device.